HTML template editor
1. Introduction
For HTML templates of the document generator, it is possible to edit the template directly in the system, without preparing the file outside eFOB. The editor lets you edit the content, formatting, and layout of the document for the final PDF output.
This article describes the editor features. The general rules for preparing templates, attaching them to document types, and the list of available fields are described in Document generator templates.
2. Opening the editor
To open the editor:
- Go to the details of the document type.
- Find the template file and select Edit file from the drop-down menu.
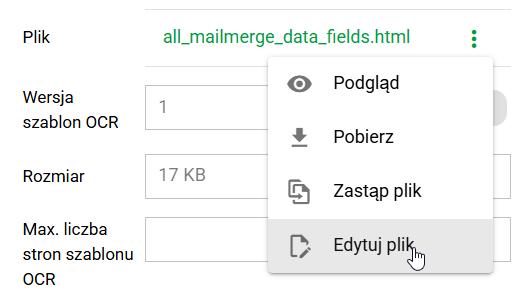
Fig 1. Opening HTML file editing from the document type details
A faster route starts directly on the document types list: in the actions column, between the Edit document type and Edit OCR fields buttons, there is an Edit template file button (Add template file for a type without templates). If the type has a single template, the editor opens immediately; with several templates a list drops down in which each template is described by its name plus file and version number – clicking an entry opens the selected template for editing. Details in Document generator templates.
The editor can also be started from an empty template while adding an HTML template to a document type – the Create empty HTML template option described in Document generator templates.
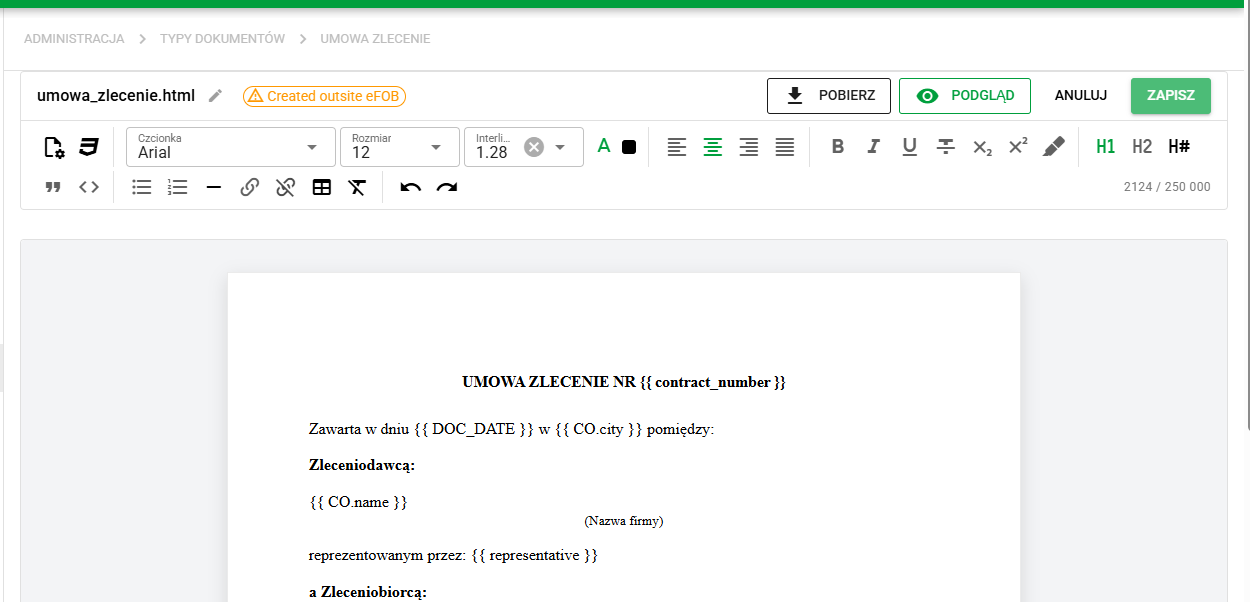
Fig 2. HTML template editor with the main functions
3. Editor elements
The editor provides tools for working with content, formatting, and document layout. Most of them are available in the toolbar at the top of the screen, and some open additional settings dialogs.
Document layout and styles
At the beginning of the toolbar there is the Document settings button (1), which opens a single dialog with settings that affect the layout and shared appearance of the entire document. The dialog has two tabs:
- Page settings - More information,
- Document styles - More information.
Changes in both tabs are immediately visible in the editor; Cancel restores the previous values in both tabs at once, and Apply saves them together. Applying settings does not save the whole template.
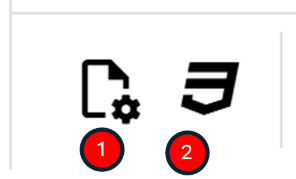
Fig 3. Document layout settings
Editor options
The next part of the toolbar contains functions useful during day-to-day document editing:
- selecting font family (3), size (4), and line height (5),
- setting text color (6),
- paragraph alignment (7),
- bold (8), italic (9), underline (10), and strikethrough (11),
- subscript (12) and superscript (13),
- highlighting text (14),
- inserting headings (15),
- blockquotes (16) and code blocks (17),
- numbered (18) and bulleted lists (19),
- inserting a horizontal rule (20),
- inserting a page break - More information,
- inserting a conditional checkbox - More information,
- adding (21) and removing links (22),
- table operations (23) - More information,
- clearing formatting (24),
- undoing (25) and redoing changes (26).

Fig 4. Editor options - part 1

Fig 5. Editor options - part 2
The editor shows a character counter and the size of the complete HTML file. The text limit is 250,000 characters, and the editor's file limit is 1 MiB (1,048,576 bytes). The file size includes content, HTML markup, styles, metadata and embedded images. Changes exceeding the file limit are rejected; the size is also checked before preview, download and save. The server additionally enforces its configured limit during preview and save.
Field and function suggestions
As you type template code, a suggestion list appears at the cursor. Each entry contains the field name or function syntax and a short description.
- Type
{{followed by part of a field name, for example{{ E.first. - Choose a suggestion with the arrow keys and confirm with Enter or Tab, or click an entry.
- To add a filter, position the cursor inside the expression before its closing braces and type
|, for example{{ E.sex | sal. Afteris, tests such asdefinedare available. Typing{%opens statement suggestions, includingif,forandset.
Press Escape to dismiss the list. The Template fields and functions toolbar button opens a searchable catalog; Ctrl+Space opens it too. Search matches names and descriptions. Choosing a function from the catalog inserts an example expression.
The catalog includes standard fields for document dates, the employee and their addresses, the candidate and their addresses, employment, the project, the client, project managers, the billing company and the combined employer data ER.ALL.*. The C.* fields apply to candidate cases. Other field values also depend on the data and generation context; appearing in the catalog does not mean a field will be populated in every document.
Suggestions cover the permitted filters, including pln, address, salutation, gender and er_*, as well as tests, conditional statements and loops. Enter custom form fields, Excel column names and configuration-specific additional fields using their technical names. They are not part of the standard catalog. The Jinja2 examples describe filter arguments and usage.
Employee positions and employers
Use the following fields to insert the positions and employers assigned to the employee:
| Data | HTML template | DOCX MergeField |
|---|---|---|
| Employee positions | {{ E.position }} | E.position |
| Employee employers | {{ E.employer }} | E.employer |
With one assignment, the field returns one name. With multiple assignments, the generator joins all names with a comma and a space, in alphabetical order, for example Manager, Warehouse worker. No assignments produce empty text. Employers use their full dictionary names.
These fields are available when generating a document for an employee, including an employee case. E.employer includes only employers assigned to that employee. The combined ER.ALL.* fields refer to the employer dictionary and do not replace this field.
Positions: {{ E.position }}
Employers: {{ E.employer }}
Use E.position for the position name. job_title is not a standard generator field; it may be a custom form field or an Excel column name.
Pasting images
Place the cursor in the document and paste an image from the clipboard, for example with Ctrl+V, or choose the Insert image toolbar icon and select a file. Both methods accept PNG, JPEG, GIF and WebP. Each image must be no larger than 128 KiB (131,072 bytes). SVG images and references to files on external servers are rejected.
The image is embedded in the HTML as Base64 data, so PDF generation does not require a separate image file. Base64 increases the data size by approximately one third. Several images that individually fit within 128 KiB can therefore exceed the complete template limit. In that case, the paste leaves the document unchanged and the editor displays a message. Reduce the image sizes before pasting again.
To remove formatting brought in with text, select the text and choose Clear formatting. This also clears the background of its blocks, including backgrounds applied by the template stylesheet. The change can be undone.
File handling
At the top of the editor, functions related to working with the whole file are available:
- downloading the current HTML version (27),
- previewing the generated document (28),
- canceling changes (29),
- saving the template (30).

Fig 6. File handling options
If the template was not previously saved from the eFOB editor, the system marks it with the Created outside eFOB label. This is a signal that during the first edit, it is worth checking the preview and formatting especially carefully, particularly when the file comes from an external source.
4. Document settings – Page settings
In the Page settings tab of the Document settings dialog, you can define the unit and document margins. An option for equal margins is also available, along with a quick restore to default settings.
This part of the editor is useful whenever the document needs a specific page layout, for example different margins for agreements, forms or documents prepared for signature.
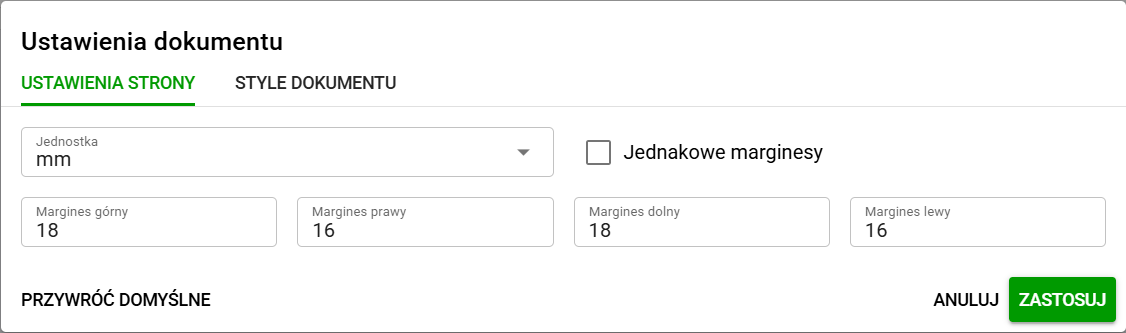
Fig 7. Page settings in the HTML editor
5. Document settings – Document styles
The Document styles tab makes it possible to define shared visual settings for the entire template. In the Basic mode, you can configure, among other things:
- the default font,
- the base text size,
- the text color,
- line height,
- paragraph spacing,
- table border color,
- table cell padding.
This makes it easier to keep the whole document visually consistent without manually adjusting many individual elements.
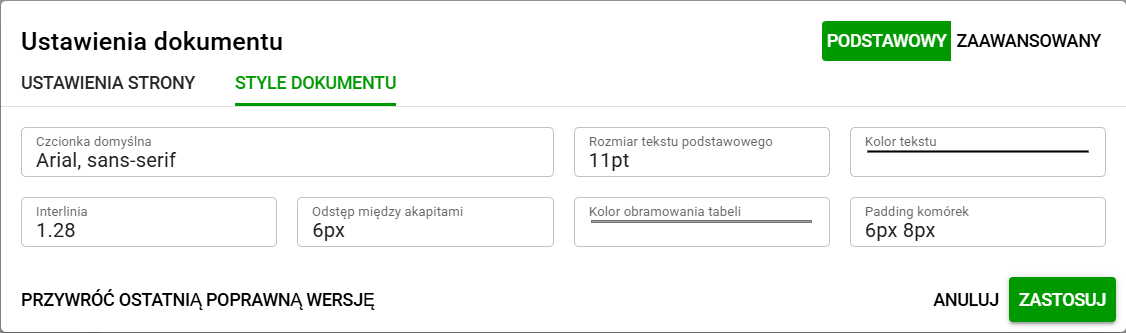
Fig 8. Document styles in the basic mode
In the Advanced mode, you can enter custom document CSS. This is useful when the basic options are not sufficient and the style of selected elements needs to be refined more precisely. If the entered CSS contains an error, the Apply button stays disabled and the Restore last valid option reverts to the last valid version.
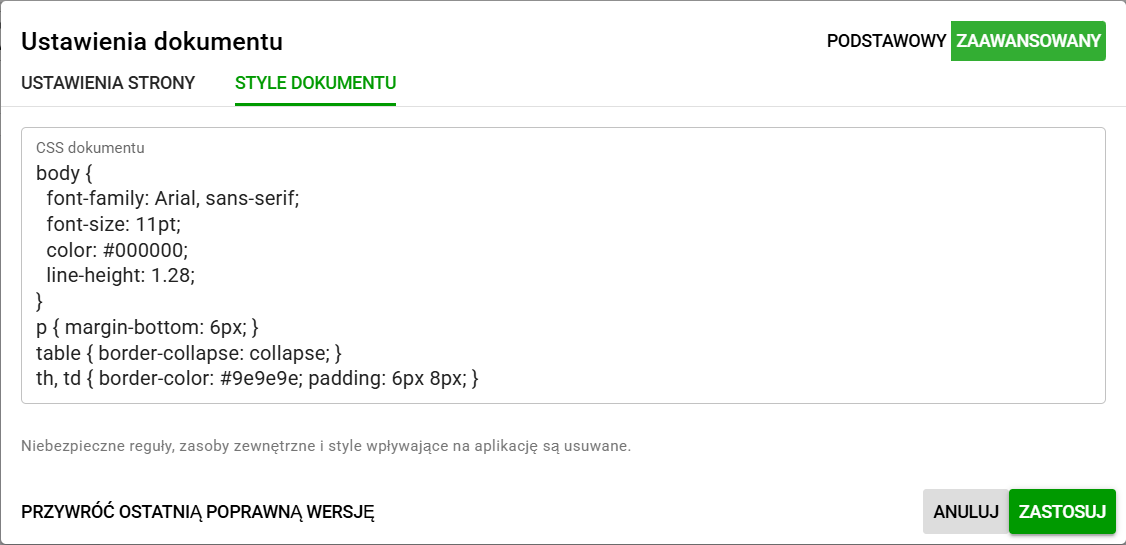
Fig 9. Document styles in the advanced mode
6. Page break
The Page break button (a page icon with a broken line, next to the horizontal rule) inserts a forced transition to a new page in the generated PDF at the cursor position – the equivalent of a "page break" in word processors.
How it works:
- in the editor, the page break is shown as a dashed line with the Page break label; it can be selected, dragged or deleted with Backspace/Delete like any other element,
- the content after the break starts on a new page only in the preview and in the generated PDF – the editor itself shows the document as one continuous page,
- a page break can be placed inside a Jinja2 condition, e.g.
{% if attachment %}…{% endif %}, so that the new page appears only when the document contains an additional section.
Avoid replacing a page break with several empty paragraphs: inserting data of a different length can shift that layout.
In the HTML file, the page break is saved as an empty element with the page-break class and the break-before: page; page-break-before: always; styles. If a template prepared outside eFOB contains an empty <div> with such a style, the editor recognizes it and also shows it as a page break.
If you only want to prevent a table from being split across pages rather than force a break, use the Do not split table between pages option in the table properties.
7. Conditional checkbox
HR forms often contain boxes to tick ("put an X in the appropriate boxes"). In an HTML template such a box is implemented with a Jinja2 condition that inserts a mark only when the condition is met, e.g. {% if overtime_consent %}X{% endif %}. Written inside a narrow box, the condition text was hard to read and edit, so the editor handles it as a dedicated element – the conditional checkbox. It is part of the generated document, not an interactive field for the PDF recipient to select.
Inserting
- Place the cursor where the box should appear and click the Conditional checkbox button (a checked box icon, next to the page break).
- In the Condition field, enter a Jinja2 expression, e.g.
overtime_consent,not overtime_consentorcare_scope == '2_days'. The condition must be a single expression – without{{ }}or{% %}delimiters and without line breaks. The limit is 200 characters. - In the Mark field, enter what should appear in the box when the condition is met – X by default, but it can also be e.g. ✕. It must contain 1 to 10 characters and cannot include braces,
%or line breaks. - Below the fields you can see the exact text that will be saved in the template. Confirm with Insert.
In the editor, the checkbox is displayed as a box with the mark and a short label with the condition, so it is immediately clear what the tick depends on. It can be selected, dragged or deleted like any other element.
When the condition is met, the box contains the chosen mark. Otherwise, it stays empty. For two opposite answers, you can use overtime_consent and not overtime_consent if the data source supplies a Boolean value. Compare text answers explicitly, for example answer == 'Yes'.
Editing
To change the condition or the mark, double-click the checkbox or select it and click the Conditional checkbox toolbar button. The same dialog opens with the current values; confirm the changes with Apply.
Saved form and compatibility with existing files
The checkbox is saved in HTML as a <span class="box"> element containing only the text {% if CONDITION %}MARK{% endif %}. The box appearance (a 17 px square with an outline) is not repeated on every checkbox – on the first insertion the editor adds a single .box { … } rule to the document styles, shared by all checkboxes. If the template already defines its own rule for the box class, the editor leaves it unchanged. The rule can be reviewed and adjusted in the Document settings dialog, on the Document styles tab.
Checkboxes are also recognized in templates prepared outside eFOB (e.g. in an external HTML editor), provided they keep the <span class="box">{% if condition %}X{% endif %}</span> format – a <span> element whose only content is the Jinja2 condition with the mark. Variants with not, a comparison ({% if care_scope == '8_hours' %}X{% endif %}), a different mark (e.g. ✕) and a blank {% else %} branch (e.g. {% if consent %}X{% else %} {% endif %}) are recognized as well. The classes and styles of such elements stay unchanged.
More complex constructs – e.g. a condition with an {% else %} branch containing another mark, a {{ … }} field inside or additional text next to the condition – remain plain text and can be edited as before.
Check how the conditions behave on a generated document: in the template preview all fields have the placeholder value "…", so every box will be ticked there.
8. Tables
The editor also includes tools for working with tables. They make it possible to define the appearance of the entire table, a selected row or an individual cell.
To create a table, open the table menu and choose Insert table. Enter 1–50 rows and 1–20 columns. The Header row option determines whether the first row is a header. Confirm to insert the table at the cursor. The default is 3 rows and 3 columns, but you can change these before insertion.
In the table, row and cell properties, the Background color field has a clear icon. Clear the value and choose Apply to remove the background color set on that element. This does not apply a white background: document styles or the background of a containing element can still affect its appearance.
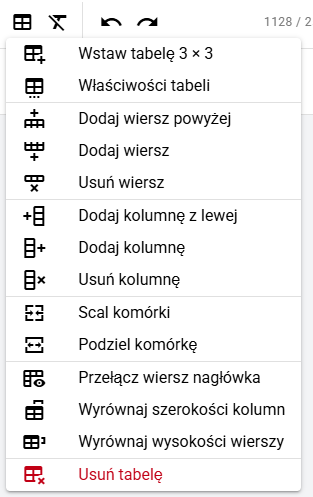
Fig 10. Table tools available in the editor toolbar
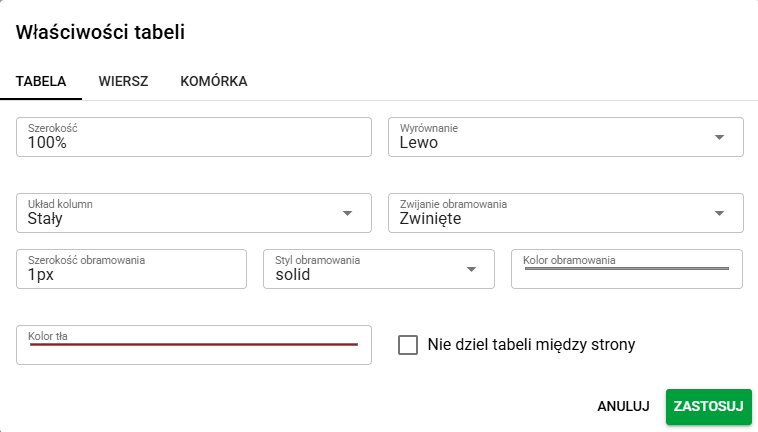
Fig 11. Table properties in the HTML editor
The Table tab is used for settings that apply to the whole table. It includes, among other things:
- table width,
- table alignment,
- column layout,
- border-collapse mode,
- border width, style and color,
- background color,
- the Do not split table between pages option.
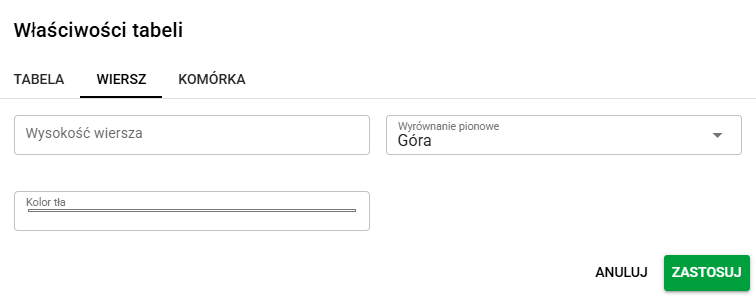
Fig 12. Properties of the selected table row
The Row tab is used for properties of the selected row, including:
- row height,
- vertical alignment of content,
- background color.
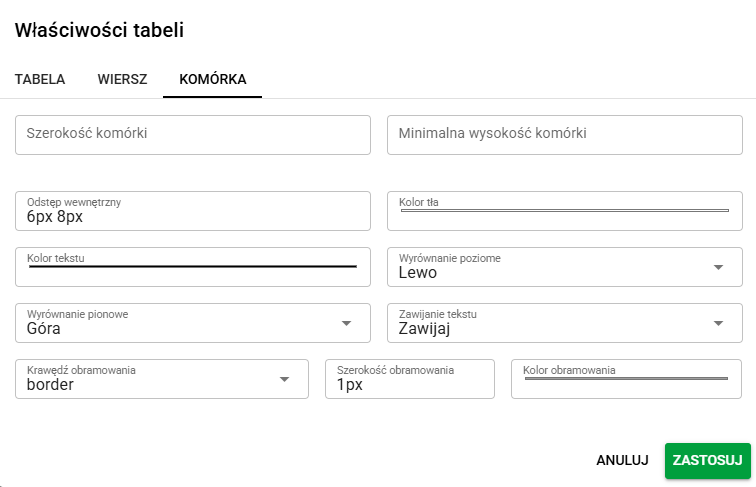
Fig 13. Properties of the selected table cell
The Cell tab provides more detailed formatting for individual cells. It includes, among other things:
- cell width,
- minimum cell height,
- inner padding,
- background color and text color,
- horizontal and vertical alignment,
- text wrapping,
- selecting the border edge together with its width and color.
9. Jinja2 syntax
In HTML templates, you can also use selected parts of Jinja2 syntax, which is the mechanism responsible for inserting data into the document and handling simple conditional logic. In practice, this means that besides simple field references such as {{ E.first_name }}, you can also use filters and conditions. The editor suggests available fields, filters, and statements after typing {{ or {% – the suggestions can also be opened with the { } toolbar button.
One of the most useful examples is the default() filter:
{{ E.first_name | default('First name not provided') }}
The default() filter makes it possible to provide a fallback value that will be used when the referenced variable is undefined. In the example above, the generator inserts the value of E.first_name, and if it is not available, it uses the text First name not provided.
If you also want empty text, an empty list or another false-evaluating value to be treated as missing, you can use the variant with the second argument set to true:
{{ E.first_name | default('First name not provided', true) }}
This variant is useful when the field formally exists, but its value is empty and the document should display fallback text instead.
Another simple and frequently useful example is the upper() filter, which converts text to uppercase:
{{ E.last_name | upper }}
The if statement is used to show parts of the document conditionally. The recommended form checks whether the field has a non-empty value:
{% if E.middle_name %}Middle name: {{ E.middle_name }}{% else %}No middle name{% endif %}
Note that in the template preview all fields have the placeholder value "…", so every condition is satisfied in the preview. Check how conditions behave on a document generated with real data. For "put an X if…" boxes, it is more convenient to use the conditional checkbox than to type the condition by hand.
Currency in words: the pln filter
Use pln in an HTML template to write an amount in Polish currency words:
Salary: {{ salary }}
Salary in words: {{ salary | pln }}
For salary equal to 3500.50, the filter returns trzy tysiące pięćset złotych 50/100. The output remains Polish in an English document. The filter accepts numbers and numeric strings with a decimal dot or comma. It removes whitespace grouping separators, including non-breaking spaces. Missing or nonnumeric values produce an empty result.
salary, sex, first_name and employer_name in these examples are custom fields passed to the generator, such as Excel column names. Replace them with your own field names. For employee data, use fields such as E.sex and E.first_name. An amount can also have a dotted path, such as E.X.salary.
In HTML, use {{ salary | pln }}. PLN(salary) is a Word merge-field expression; PLN({{ salary }}) does not invoke a function in HTML.
Pan/Pani and Mr/Ms: the salutation filter
The salutation filter selects a title from the sex field:
{{ sex | salutation }} {{ first_name }}
{{ E.sex | salutation }} {{ E.first_name }}
{{ sex | salutation("en") }} {{ first_name }}
The first example produces Pan Tomasz or Pani Zuzanna, depending on the data. The default language is Polish (Pan / Pani); "en" selects Mr / Ms.
Default recognized values are:
- male:
M,male,man,mężczyzna,mezczyzna, - female:
K,F,female,woman,kobieta.
Matching ignores case and surrounding whitespace. The filter does not infer sex from a name. Missing or unrecognized values produce an empty string. Use default to provide neutral text instead:
{{ sex | salutation("en", default="Dear colleague") }}
If the source system uses different sex codes, configure them explicitly. Numeric codes are also supported:
{{ sex | salutation(male_values=[1], female_values=[2], default="Osoba") }}
{{ sex | salutation("en", male_values=["X"], female_values=["Y"], default="Dear colleague") }}
Each supplied list replaces the defaults for that sex. A single string, such as male_values="M", is also accepted. Numeric code 1 also matches string "1". A code cannot appear on both lists; overlapping codes are rejected. Supported languages are "pl" and "en".
Choosing word forms: the gender filter
The gender filter lets you supply male, female and neutral forms:
{{ sex | gender("zatrudniony", "zatrudniona", default="osoba zatrudniona") }}
{{ sex | gender("he", "she", default="they") }}
{{ sex | gender("employed man", "employed woman", default="employed person", male_values=[1], female_values=[2]) }}
The first argument is the male form, and the second is the female form. Sex matching and the male_values, female_values and default arguments work in the same way as for salutation.
Printable addresses: the address filter
Insert an employee's full address into an HTML template with one expression:
{{ E.A | address }}
For Lipowa street, building number 12, apartment 3, postcode 00-001 and city Warszawa, the result is Lipowa 12/3, 00-001 Warszawa. The filter skips empty components, removes extra whitespace and does not leave orphan slashes, commas or empty parentheses. Without an apartment number, the result is Lipowa 12, 00-001 Warszawa.
Choose a layout with the layout argument:
| Expression | Result |
|---|---|
{{ E.A | address }} | Lipowa 12/3, 00-001 Warszawa |
{{ E.A | address(layout="parentheses") }} | Lipowa 12/3 (00-001 Warszawa) |
{{ E.A | address(layout="multiline") }} | Street and number on the first line, postcode and city on the second |
The default layout is "inline". Add include_country=true to append the country. An empty address produces an empty string; use default to supply fallback text:
{{ E.A | address(layout="parentheses", include_country=true) }}
{{ E.A | address(default="No address") }}
The same filter supports the correspondence address E.AB, candidate address C.A and company address CO when their data is available in the document context. It does not change individual address fields or the employer address ER.ALL.A.
The "multiline" layout inserts newline characters, not HTML tags. Set white-space: pre-line on the containing element to display those line breaks in the document:
<p style="white-space: pre-line">{{ E.A | address(layout="multiline") }}</p>
The address filter is available in HTML templates, not as a DOCX MergeField function.
Employer details: the er_* filters
Pass an employer's full name, either as text or as a field value:
{{ "My Company" | er_p }}
{{ employer_name | er_a }}
{{ employer_name | er_nip }}
| Filter | Returned value |
|---|---|
er_a | Printable address |
er_p | Printable name |
er_s | Short name |
er_nip | NIP |
er_regon | REGON |
er_krs | KRS |
er_pesel | PESEL |
Name matching ignores case and extra whitespace. Lookups use the employers supplied for document generation. Missing employers or empty attributes produce an empty string.
The filters look up one employer. For aggregate data, use ER.ALL fields such as {{ ER.ALL.P }} or {{ ER.ALL.A }}. Nonempty values are joined with a semicolon and newline. See the ER.ALL section for available suffixes.
Inline if/else conditions
Choose text directly inside a field, including nested conditions:
{{ "Pani" if sex == "Kobieta" else "Pan" if sex == "Mężczyzna" else "Szanowna Osobo" }}
This returns Pani, Pan or Szanowna Osobo. String comparisons are case-sensitive: Kobieta and kobieta are different values. A missing sex selects the final fallback. Fields and filters can be used in the result branches. Compare against the values actually provided by your data source; translating the document does not translate those values.
For longer passages, use a conditional block:
{% if sex == "Kobieta" %}
Pani {{ first_name }}
{% elif sex == "Mężczyzna" %}
Pan {{ first_name }}
{% else %}
Szanowna Osobo
{% endif %}
Other filters and restrictions
The generator allows selected standard Jinja2 filters: upper, lower, title, capitalize, trim, default, replace, length, join, sort and unique. The pln, salutation, gender, address and er_* filters described above are document-generator extensions.
Dynamic values are inserted as text rather than HTML code. Arbitrary function or method calls, template imports and includes are not allowed. Any attribute whose name starts with _ is blocked, including attributes passed to a filter, for example sort(attribute='_meta'). Validation covers the entire template, including if branches that are not selected for the current data. The Jinja2 reference covers more features than eFOB supports.
Processing limits
During generation, eFOB limits the size of data processed by a template, the number of iterations and the total work performed. These safeguards help protect the generator from excessive load. If a limit is exceeded, rendering stops with an error.
Useful reference materials: