Document generator templates
1. Introduction
The eFOB platform enables generating documents based on templates, similarly to mechanisms for generating documents based on mail merge. Users can create their own *.docx templates using the LibreOffice application compatible with MS Word, or *.html by preparing a file in this language code.
When generating documents, eFOB automatically fills document fields with data from system modules (e.g. Employees, Candidates, Cases) or data from columns from the attached Excel. Thanks to this mechanism, generating employee documents based on templates becomes easy and effective.
We recommend that you read document generator limitations before using templates.
2. Preparation of templates
Word Templates (*.docx)
- To insert a field into the template, go to the "Inserting" tab
- Place the cursor where you want to insert the field
- In the Text section, select “Quick Parts” and then “Field”
- Find MergeField on the list
- In "Field name" enter the code from the list of available generator fields
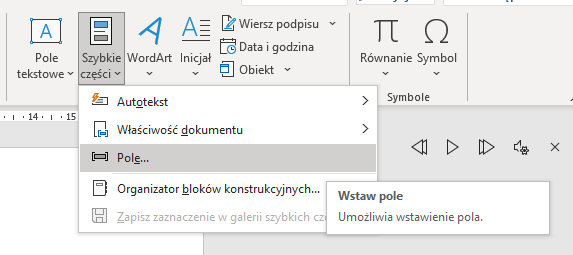
Fig 1. Adding fields to the template in MS Word (step 3)
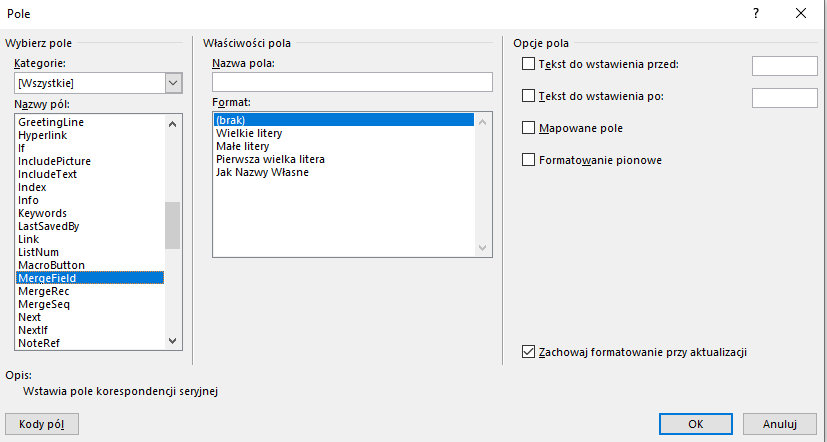
Fig 2. Adding fields to the template in MS Word (step 4)
Sample text with MergeFields inserted «»
My name is «E.first_name» and my surname is «E.last_name».
HTML templates (*.html)
To prepare an HTML template, it is necessary to create a file that meets the following assumptions:
- The file must have the extension .html.
- It is necessary that the file starts with <!DOCTYPE html>(1).
- The file must contain at least 3 sections:
- <html></html>, inside which the rest of the code will be located (2);
- <head></head>, which will contain information about the file itself, such as the fonts used or any graphic settings or encoding used(3);
- <body></body>, which will contain the actual part of the document - content, formatting, elements such as tables or possible images (we encourage images to be sent in Base64 code)(4).
Any fields to be generated must be enclosed in double braces, for example {{ E.first\_name }}(5).
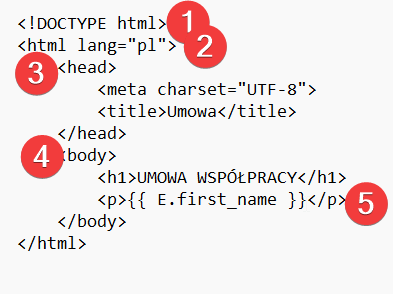
Fig 3. Example HTML template structure
3. Configuring the template in eFOB
To use a template, link it to an existing document type or create a new type for it. A document type can have several available templates, for example in different languages and validity periods. Before generating a document, choose the appropriate template rather than assuming the type always identifies one file.
1. In the eFOB application, go to the Administration menu and select the Document Types module
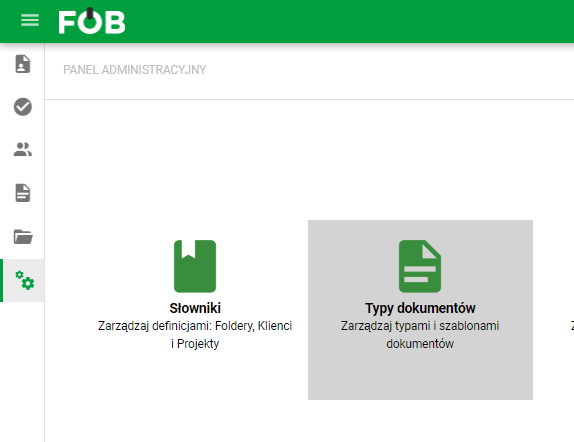
Fig 4. Document types
2. Search for the document type you want to use and open its editing view 3. In the Template details section, press the Add template button(1) 4. Depending on what type of template we want to pass, we choose Word(2) or HTML(3) 5. Select a file with the appropriate extension from our computer(4) 5. Press the Verify button (5)
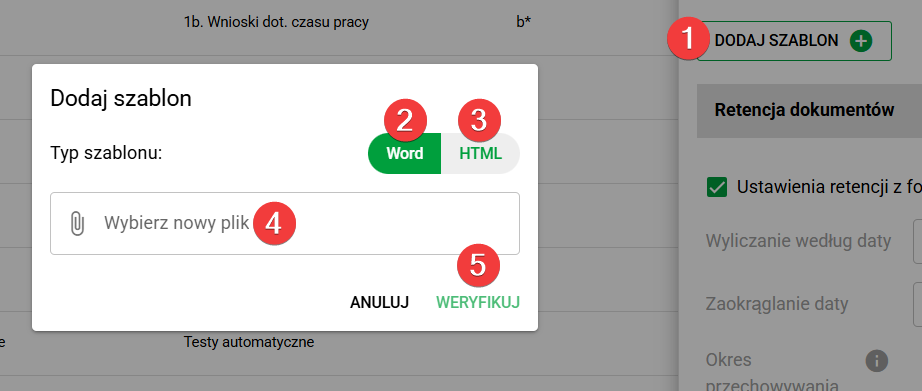
Fig 5. Adding a template to a document type
6. After a moment, a print preview of the template appears, where all field values will be replaced with "...". If everything is correct, click Save template to assign it to the selected document type.
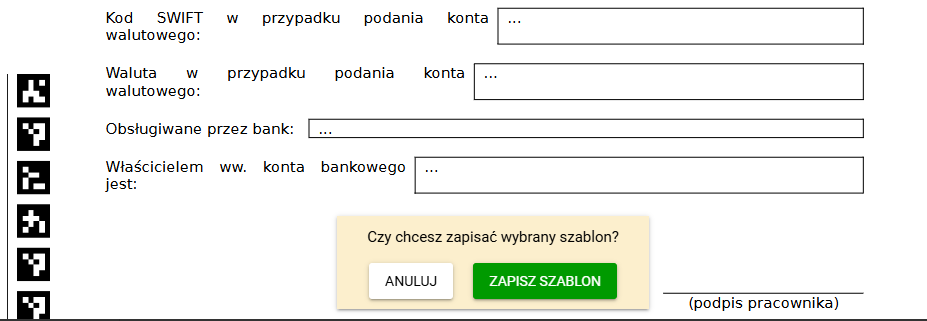
Fig 6. Accepting and saving the template to the document type
For HTML templates, an additional starting flow is also available. After selecting the HTML type, you can:
- start the editor from an empty template using Create an empty HTML template,
- or provide an existing file using Upload HTML file.
The first option opens the editor immediately, so the template can be built directly in eFOB instead of first adding an empty file. The second option is useful when the template already exists locally and should be imported into the application.
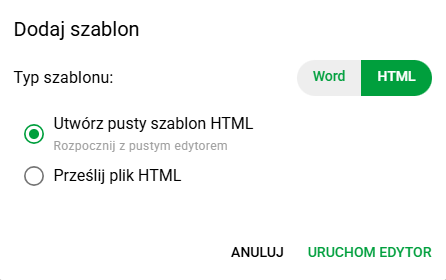
Fig 7. Choosing whether to start from an empty HTML template or upload an HTML file
4. Editing templates
For both template types, it is possible to replace the file in the system. To do this:
- Select the document type you want and open its details.
- Find the relevant template file and choose Replace file from the drop-down menu(1).
- In the new window, select the template type(2), choose the file from your computer(3), and run the verification(4).
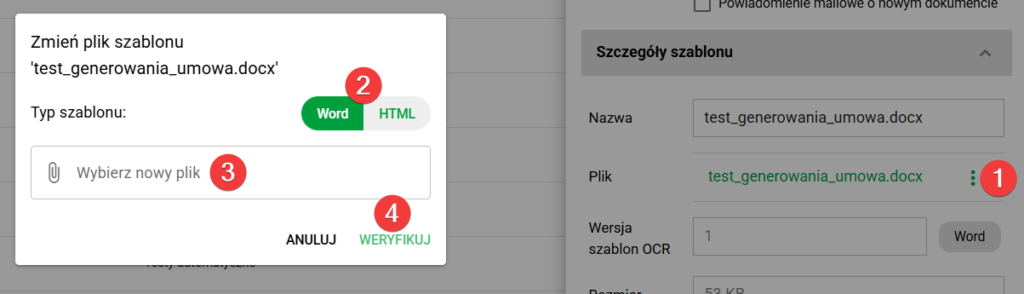
Fig 8. Replacing an existing template file
For HTML templates, it is also possible to edit the template directly in the system. To start this:
- Go to the details of the document type.
- Find the template file and select Edit file from the drop-down menu.
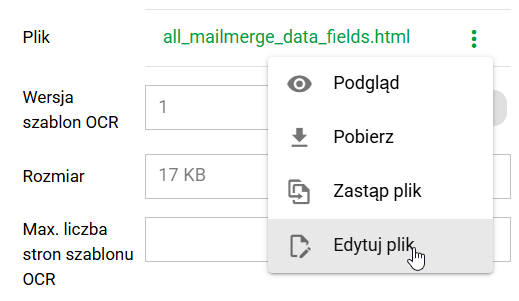
Fig 9. Opening HTML file editing from the document type details
An editor opens that lets you edit the content and prepare the document layout for the final PDF output.
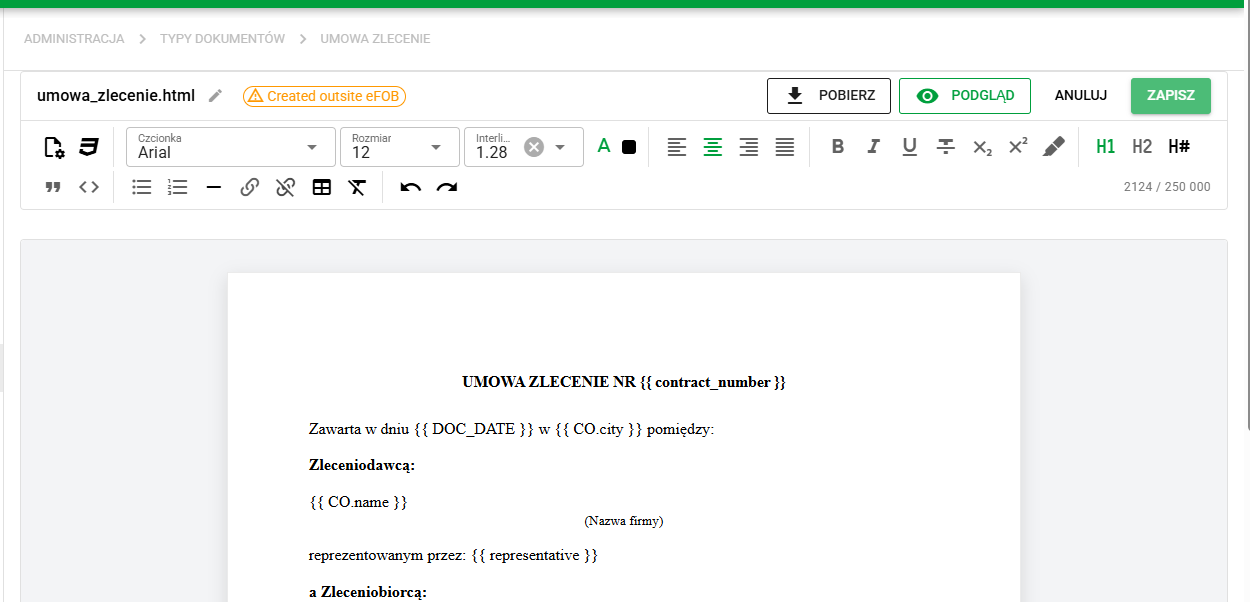
Fig 10. HTML template editor with the main functions
Editor elements
The editor provides tools for working with content, formatting, and document layout. Most of them are available in the toolbar at the top of the screen, and some open additional settings dialogs.
Document layout and styles
At the beginning of the toolbar, there are settings that affect the layout and shared appearance of the entire document:
- Page settings (1) - More information,
- Document styles (2) - More information.
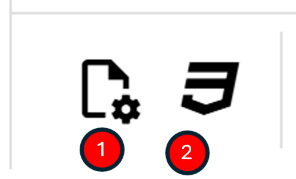
Fig 11. Document layout settings
Editor options
The next part of the toolbar contains functions useful during day-to-day document editing:
- selecting font family (3), size (4), and line height (5),
- setting text color (6),
- paragraph alignment (7),
- bold (8), italic (9), underline (10), and strikethrough (11),
- subscript (12) and superscript (13),
- highlighting text (14),
- inserting headings (15),
- blockquotes (16) and code blocks (17),
- numbered (18) and bulleted lists (19),
- inserting a horizontal rule (20),
- adding (21) and removing links (22),
- table operations (23) - More information,
- clearing formatting (24),
- undoing (25) and redoing changes (26).

Fig 12. Editor options - part 1

Fig 13. Editor options - part 2
The editor also shows a character counter, which helps control content length in more extensive templates.
File handling
At the top of the editor, functions related to working with the whole file are available:
- downloading the current HTML version (27),
- previewing the generated document (28),
- canceling changes (29),
- saving the template (30).

Fig 14. File handling options
If the template was not previously saved from the eFOB editor, the system marks it with the Created outside eFOB label. This is a signal that during the first edit, it is worth checking the preview and formatting especially carefully, particularly when the file comes from an external source.
Page settings
In the Page settings dialog, you can define the unit and document margins. An option for equal margins is also available, along with a quick restore to default settings.
This part of the editor is useful whenever the document needs a specific page layout, for example different margins for agreements, forms or documents prepared for signature.
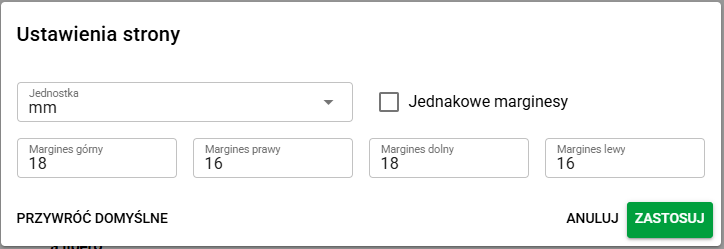
Fig 15. Page settings in the HTML editor
Document styles
The Document styles dialog makes it possible to define shared visual settings for the entire template. In the basic tab, you can configure, among other things:
- the default font,
- the base text size,
- the text color,
- line height,
- paragraph spacing,
- table border color,
- table cell padding.
This makes it easier to keep the whole document visually consistent without manually adjusting many individual elements.
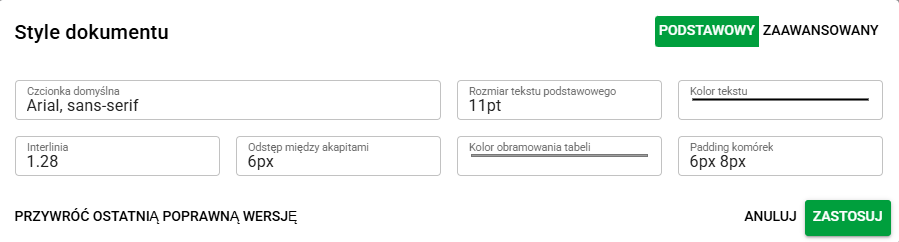
Fig 16. Document styles in the basic tab
In the advanced tab, you can enter custom document CSS. This is useful when the basic options are not sufficient and the style of selected elements needs to be refined more precisely.
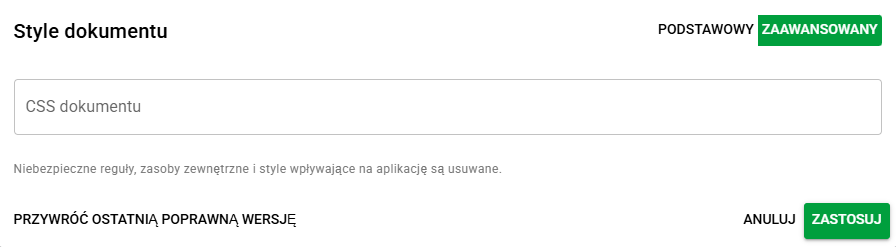
Fig 17. Document styles in the advanced tab
Tables
The editor also includes tools for working with tables. They make it possible to define the appearance of the entire table, a selected row or an individual cell.
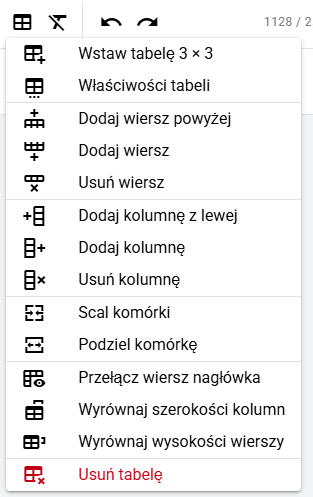
Fig 18. Table tools available in the editor toolbar
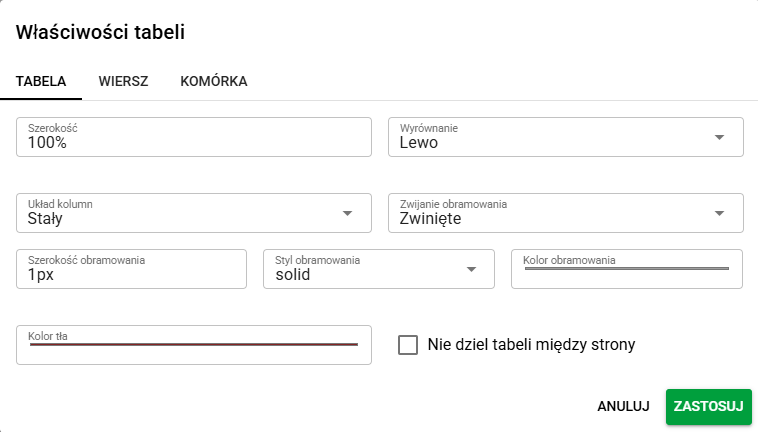
Fig 19. Table properties in the HTML editor
The Table tab is used for settings that apply to the whole table. It includes, among other things:
- table width,
- table alignment,
- column layout,
- border-collapse mode,
- border width, style and color,
- background color,
- the Do not split table between pages option.
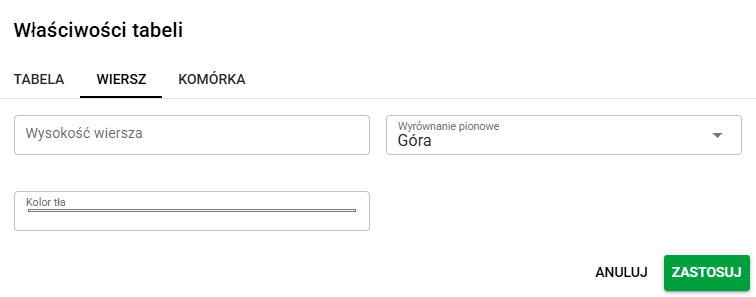
Fig 20. Properties of the selected table row
The Row tab is used for properties of the selected row, including:
- row height,
- vertical alignment of content,
- background color.
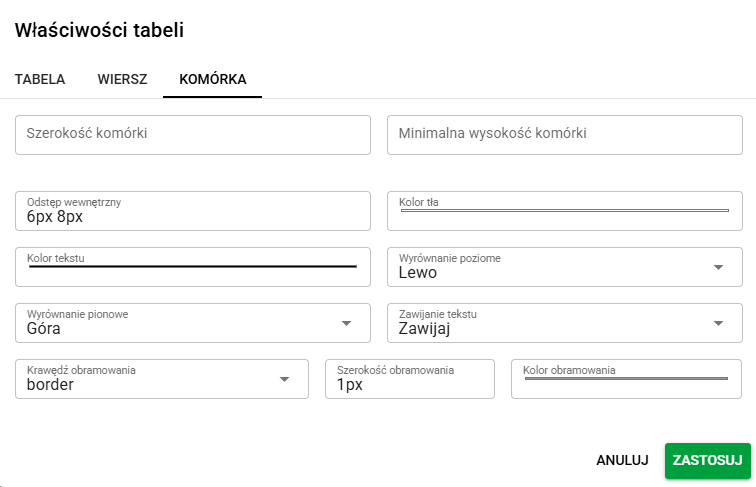
Fig 21. Properties of the selected table cell
The Cell tab provides more detailed formatting for individual cells. It includes, among other things:
- cell width,
- minimum cell height,
- inner padding,
- background color and text color,
- horizontal and vertical alignment,
- text wrapping,
- selecting the border edge together with its width and color.
Jinja2 syntax
In HTML templates, you can also use selected parts of Jinja2 syntax, which is the mechanism responsible for inserting data into the document and handling simple conditional logic. In practice, this means that besides simple field references such as {{ E.first_name }}, you can also use filters.
One of the most useful examples is the default() filter:
{{ E.first_name | default('First name not provided') }}
The default() filter makes it possible to provide a fallback value that will be used when the referenced variable is undefined. In the example above, the generator inserts the value of E.first_name, and if it is not available, it uses the text First name not provided.
If you also want empty text, an empty list or another false-evaluating value to be treated as missing, you can use the variant with the second argument set to true:
{{ E.first_name | default('First name not provided', true) }}
This variant is useful when the field formally exists, but its value is empty and the document should display fallback text instead.
Another simple and frequently useful example is the upper() filter, which converts text to uppercase:
{{ E.last_name | upper }}
Useful reference materials:
- Jinja
defaultfilter - Jinja
upperfilter - Jinja filters reference
- Jinja tests reference
- Jinja template designer documentation
5. List of available document generator fields
CANDIDATE (C)
Note: In version 2.27, the CND code was replaced by the shorter C code, similarly the ADR_P, ADR_B, PRJ codes were replaced by the shorter A, AB, PR codes.
| ID | Type | Requirement | Description |
|---|---|---|---|
| first_name | TEXT | T | Name |
| last_name | TEXT | T | Surname |
| middle_name | TEXT | N | Middle name |
| maiden_name | TEXT | N | Maiden name |
| birth_date | DATE | N | Date of birth |
| place_of_birth | TEXT | N | Place of birth |
| PESEL | TEXT(11) | N | PESEL number (specific to Poland) |
| driving_license | TEXT | N | Driving license number |
| personal_email | TEXT | N | Private email |
| personal_phone | TEXT | N | Private phone |
| A | ENTITY | N | Private address (from 'primary_postal_address') |
| business_email | TEXT | N | Business email |
| business_phone | TEXT | N | Business phone |
| PR | ENTITY | N | The project concerned by Boarding |
| AB | ENTITY | N | Business stay address (from 'contact_address') |
| badr_info | LONGTEXT | N | Business stay address – extra info (from ‘contact_address_information’) |
| additional_info | LONGTEXT | N | Additional information |
| iban | TEXT | N | IBAN number |
| contract_start_date | DATE | N | Contract start date |
| contract_end_date | DATE | N | Contract end date |
| rating | INT | N | Candidate evaluation |
| rating_comment | LONGTEXT | N | Comment on candidate evaluation |
| nationality | TEXT | N | Nationality |
| mother_name | TEXT | N | Mother's name |
| father_name | TEXT | N | Father's name |
| X | ENTITY | N | Additional custom fields in Candidates – see description below |
EMPLOYEE (E)
Note: In version 2.27, the EMP code was replaced by the shorter E code, similarly the ADR_P, ADR_B, PRJ codes were replaced by the shorter A, AB, PR codes
| ID | Type | Requirement | Description |
|---|---|---|---|
| id | INT | T | Employee ID (worker) |
| state | TEXT | T | One of the statuses from the 'worker_status' list: (0, 'Prospect'), (1, ‘On-Boarding’), (2, ‘Hired’), (3, ‘Resigning’), (4, ‘Off-Boarding’), (5, ‘Blocked’), |
| first_name | TEXT | T | Name |
| last_name | TEXT | T | Surname |
| middle_name | TEXT | N | Middle name |
| maiden_name | TEXT | N | Maiden name |
| sex | LETTER | N | One of the values: – Man – Woman – Others – Undefined |
| birth_date | DATE | N | Date of birth |
| PESEL | TEXT(11) | N | PESEL number (specific to Poland) |
| driving_license | TEXT | N | Driving license number |
| personal_email | TEXT | N | Private email |
| personal_phone | TEXT | N | Private phone |
| A | ENTITY | N | Personal/Private address (from 'primary_postal_address') |
| business_email | TEXT | N | Business email |
| business_phone | TEXT | N | Business phone |
| PR | ENTITY | N | The project concerned by Boarding |
| AB | ENTITY | N | Business address of stay (from ‘contact_address’) |
| badr_info | LONGTEXT | N | Business address extra info (from ‘contact_address_information’) |
| additional_info | LONGTEXT | N | Additional information |
| place_of_birth | TEXT | N | Place of birth |
| country_birth | TEXT | N | Country of birth |
| identity_doc_expiry | DATE | N | Expiration date of the identity document |
| identity_doc_num | TEXT | N | Identity document number |
| identity_doc_type | TEXT | N | Identity document type name, returned in Polish: – Dowód osobisty (national ID) – Paszport (passport) – Prawo jazdy (driving licence) – Inny typ dokumentu tożsamości (other identity document) – Dowód tożsamości starego typu (legacy identity document) – Elektroniczny dowód osobisty (electronic identity card) – Zezwolenie na pobyt (residence permit) – Zezwolenie na pracę (work permit) – Tymczasowy dokument tożsamości (temporary identity document) – Karta rezydenta (residence card) – Certyfikat rejestracji (registration certificate) |
| citizenship | TEXT | N | Citizenship |
| nationality | TEXT | N | Nationality |
| iban | TEXT | N | IBAN number |
| contract_start_date | DATE | N | Contract start date |
| contract_end_date | DATE | N | Contract end date |
| rating | INT | N | Employee evaluation |
| rating_comment | LONGTEXT | N | Comment on employee evaluation |
| external_id_1 | TEXT | N | External ID 1 |
| external_id_2 | TEXT | N | External ID 2 |
| mother_name | TEXT | N | Mother's name |
| father_name | TEXT | N | Father's name |
| X | ENTITY | N | Additional custom fields in Employees – see description below |
E.identity_doc_type returns the document type name in Polish, not the numeric code used when importing employees. An empty or unrecognized value returns Nieznany (unknown). Use these actual output values when writing conditions in a template.
ADDRESS (A)
Note: Up to and including version 2.26, the module code "ADR" applies (shorter "A" from 2.27).
| ID | Type | Requirement | Description |
|---|---|---|---|
| id | INT | T | Customer ID |
| state | TEXT | T | One of the states on the list: (0, 'Deleted'), (1, 'Active'), |
| street | TEXT | N | Street |
| street_nb | TEXT | N | House number |
| property_number | TEXT | N | Apartment number |
| zip_code | TEXT | N | Postal code |
| city | TEXT | N | City |
| region | TEXT | N | Region |
| country | TEXT | N | Country (text) |
| description | TEXT | N | Description |
BOARDING (B)
Note: Up to and including version 2.26, the module code "BRD" applies (shorter "B" from 2.27).
| ID | Type | Requirement | Description |
|---|---|---|---|
| id | INT | T | Boarding ID |
| state | TEXT | T | One of the states from the 'boarding_status' list: (0, 'Prospect'), (1, ‘On-Boarding’), (2, ‘Waiting’), (3, ‘Hired’), (4, ‘Changing’), (5, ‘Transitioning’), (6, ‘Resigning’), (7, ‘Off-Boarding’), (8, ‘Terminated’), (9, ‘Blocked’), (10, ‘Historical’), |
| onboarding_date | DATE | N | Data onboarding (with Boarding) |
| offboarding_date | DATE | N | Date offboarding (with Boarding) |
| start_date | DATE | T | Start date |
| finish_date | DATE | N | End date |
| contract_start_date | DATE | N | Contract start date |
| contract_end_date | DATE | N | Contract end date |
| PR | ENTITY | N | The project concerned by Boarding |
| E | ENTITY | T | Employee affected by Boarding |
PROJECT (PR)
Note: Up to and including version 2.26, the module code "PRJ" applies (shorter "PR" from 2.27).
| ID | Type | Requirement | Description |
|---|---|---|---|
| id | INT | T | Project ID |
| state | TEXT | T | One of the states on the list: ACTIVE = (0, “Active”) INACTIVE = (1, “Inactive”) DELETED = (2, “Deleted”) |
| name | TEXT | T | Project name |
| start_date | DATE | N | Project start date |
| end_date | DATE | N | Project end date |
| CL | ENTITY | N | The associated entity of the client that owns the Project |
CUSTOMER (CL)
Note: Up to and including version 2.26, the module code "CLI" applies (shorter "CL" from 2.27).
| ID | Type | Requirement | Description |
|---|---|---|---|
| id | INT | T | Client ID |
| state | TEXT | T | One of the states on the list: (1, 'Lead'), (2, ‘Opportunity’), (3, ‘Contracted’), (4, ‘Rejected’), (5, ‘Closed’) |
| name | TEXT | T | Customer name |
| code | TEXT | N | Customer code |
| ADR | ENTITY | N | Related entity of customer master address |
COMPANY (CO)
| ID | Type | Requirement | Description |
|---|---|---|---|
| CO.name | TEXT | T | Company name |
| CO.contact_number1 | TEXT | N | First phone number |
| CO.contact_number2 | TEXT | N | Second phone number |
| CO.email | TEXT | N | Email address |
| CO.contact_www | TEXT | N | Website address |
| CO.nip | TEXT | N | Tax Identification Number |
| CO.KRS | TEXT | N | KRS |
| CO.regon | TEXT | N | REGON |
| CO.street | TEXT | N | Street name |
| CO.street_nb | TEXT | N | Street number |
| CO.property_number | TEXT | N | Building number |
| CO.zip_code | TEXT | N | Postal code |
| CO.city | TEXT | N | City |
| CO.region | TEXT | N | Region |
| CO.country | TEXT | N | Country (text) |
| CO.description | TEXT | N | Description |
| CO.district | TEXT | N | County |
| CO.sub_district | TEXT | N | Commune |
6. Own fields
Own fields in Employees and Candidates
On the eFOB platform, it is possible to add custom fields in the CANDIDATE (C) and EMPLOYEE (E) entities. Their values can be accessed via the X tag.
Usage examples
- E.X.position – value of the LIST custom field 'position' on the employee
- C.X.references – value of the TEXT custom field 'references' on the candidate
Custom fields from Excel in the document generator
Using the functionality of generating documents from an Excel file (described, among others, in the chapter Generating documents - eFOB), any additional fields of column names taken from the header - from the first data line of the attached Excel file - are available to the generator.NOTE: column names (header) should have clear, unique names, without spaces and Polish characters
7. Special fields and functions
Word IF function {}
To handle more complex structures, it is possible to condition the display of text and other MERGEFIELDs by using the IF {} function. A condition can contain nested fields. Spaces are MANDATORY before and after the operator (<, <>, >, <=, >=, =). Values are best placed in quotation marks. Microsoft-style regular expressions (?, *) are supported for the <> and = operators.
Usage example
- { IF { MERGEFIELD reason } <> “” “Reason for changing the contract: { MERGEFIELD reason }.” } -> will add a paragraph only if the 'reason' field is not empty
- { IF { MERGEFIELD salary_increase } = “Yes” “The employee will receive a raise in the amount of: { MERGEFIELD salary_increase }.” “”} -> will add a paragraph and insert the text plus the value from the ‘salary_increase’ field, only if the ‘increase’ field is set to “Yes”
Handling “Unknown” display error
In some cases, e.g. lack of custom field data, conditional instructions begin to incorrectly display the text "UNKNOWN". A currently known workaround is to add a check using an additional IF condition that also declares a variable, which prevents display errors:
- { IF { MERGEFIELD sometimes_empty_field } = “UNKNOWN” “No value.” }{ IF { MERGEFIELD sometimes_empty_field }” = “Increase” { MERGEFIELD salary_increase } }
Document generator date fields
If the generator encounters fields with specific names in MailMerge fields, it will replace them according to the description of their operation.
| ID | Type | Requirement | Description |
|---|---|---|---|
| TODAY | TEXT | N | System date (“Today”) formatted into text as YYYY-MM-DD (e.g. 2025-12-22). |
| DOC_DATE | TEXT | N | "Issuance date" downloaded from the "Generate documents" window formatted to text as YYYY-MM-DD |
PLN function
The PLN() function allows you to return a value 'in Polish zlotys' based on the given value.
Syntax
- PLN(field)
- If the value for a field is text, it removes spaces, standardizes 'commas' and tries to convert the value to a floating point number (
float) - if this fails (e.g. incorrect format), it returns an empty string. - If the value is 0, it returns "zero zlotys 00/100".
- Splits the value into zlotys (integer part) and groszy (two digits after the decimal point, rounded).
- Supports negative numbers - adds the word "minus".
- The zloty part is written in words in Polish (e.g. "two thousand five hundred zlotys"), the maximum supported is "billions").
- Pennies are always displayed as a two-digit number after a slash, e.g. "45/100", "00/100".
- The function selects the correct form of the word "złoty" depending on the number (złoty, zloty, zloty).
- The final result is text in the format: "<amount in words> <złoty/złoty/złotych> <grosze>/100", e.g. "three zlotys 02/100".
Usage examples
- «PLN(E.salary)» -> for the field value E.salary == 9600.50 it will return the value 'nine thousand six hundred 50/100'
- «PLN(bonus)» -> for the field value bonus == 15000 it will return the value 'fifteen thousand 00/100'
SWITCH function
The SWITCH() function, based on the concept known from Excel (SWITCH function – Microsoft Support), allows you to return a specific value depending on the result of comparing the given expression with a set of conditions. Makes it easier to write clear business rules for the document generator.
Syntax
- SWITCH(field, condition1, value1, condition2, value2, …, [optional] value_default)
- The MergeField length limit is 255 characters, so the length of the entire SWITCH function must be within this limit
- All fields are separated by commas, and the function name itself is written in capital letters with SWITCH() brackets
- field – must refer to fields according to the naming scheme described above
- conditionX and valueX – by default, it is truncated from both sides by spaces
- conditionX and valueX – the characters " and " cannot be used in these fields,
- default_value – is an optional field
Usage examples
- «SWITCH(E.A.city,Warszawa,Warsaw_,Kraków,Cracow,Other city»_ -> will change the name of the city from Polish to English
- «SWITCH(E.X.position,E,Employee,MGR,Manager» -> will change the name of the own field 'position' to the appropriate
- «SWITCH(E.X.bonus,0,None,1,Granted,No information» -> will decode the 'bonus' custom field into appropriate values along with the default value 'No information'
ER function
The ER().<> function allows you to return the value of a given attribute of a specific Employer, as long as it is in the Employers dictionary, regardless of whether it has the 'Active' status or not.
Syntax
- ER(field).<operation>
- If the value for the field is text, it removes spaces and normalizes uppercase and lowercase letters
- Uses the full name of the employer as the key
- Performs one of the following operations:
- A – returns the Employer's address
- P – returns the name of the Employer for printing
- S – returns the short name of the Employer
- NIP – returns the Employer's NIP number
- REGON – returns the Employer's REGON number
- KRS – returns the Employer's KRS number
- PESEL – returns the Employer's PESEL number
- In case of incorrect syntax or lack of a given Employer in the database, an empty string of characters will be returned
Usage examples
Let's assume that there is an Employer with the following data in the database:
-
full name: My company
-
address: ul. Uliczna 1, 00-000, Miasto
-
short name: Mine
-
NIP: 1169595501
-
REGON: 553277064
-
KRS: 0000123456
-
PESEL: 17020866246
-
«ER(firma).A» -> for the field value company == 'My company' will return the value 'ul. Uliczna 1, 00-000, Miasto'
-
«ER(firma).S» -> for the field value company == 'MY COMPANY' will return the value 'My'
-
«ER(company).NIP» -> for the field value company == 'my company' will return the value '1169595501'
ER.ALL function
The ER.ALL.<> function allows you to return the value of a given attribute of all Employers included in the dictionary of Employers with the 'Active' status. Their data will be listed separated by a semicolon and a new line.
Syntax- ER.ALL.<operation>
- Performs one of the following operations:
- A – returns Employers' addresses
- P – returns the names of employers for printing
- S – returns short names of Employers
- NIP – returns the Employers' NIP numbers
- REGON – returns the Employers' REGON numbers
- KRS – returns the KRS numbers of employers
- PESEL – returns the PESEL numbers of employers
- In case of incorrect syntax or missing data from the Employer, an empty string of characters will be returned in the database.
Usage examples
Let's assume there are two Employers in the database with the following data:
Employer 1:
- full name: My company
- address: ul. Uliczna 1, 00-000, Miasto
- short name: Mine
- NIP: 1169595501
- REGON: 553277064
- KRS: 0000123456
- PESEL: 17020866246
Employer 2:
-
full name: Your company
-
address: ul. Chodnikowa 2, 00-000, Miasto
-
short name:
-
Tax Identification Number:
-
REGON:
-
National Court Register:
-
PESEL: 58120384647
-
«ER.ALL.A_»_ -> will return the value:
'ul. Uliczna 1, 00-000, Miasto;
street Chodnikowa 2, 00-000, Miasto'
- «ER.ALL.S_»_ -> will return the value:
'Mine'