Document loading state automation
Introduction
Automation in the document loading state lets you combine three activities that are usually performed at the end of a case process:
- signing selected documents with facsimile,
- loading selected documents into eFile,
- moving the case to the next state after those actions are completed.
The feature runs in the background after the case enters the relevant state. This removes the need for the user to launch each action manually for every document.
When the automation is available
The automation can be configured only for a state of type document loading state in the case type configuration.
In practice, keep the following prerequisites in mind:
- the case type must concern a candidate or a worker – in types marked as Without candidate or worker a document loading state cannot be added at all, so there is nothing to automate,
- the state must have a Next state selected,
- automation rules are shown only for document types used in the selected form of that case type,
- automatic signing requires at least one signature profile to be prepared in advance.
If the selected form has no document fields, the system displays a message that automation rules are shown only for document types used in the case-type form.
Access path
To open the automation settings:
- Open Administration -> Cases.
- Select a specific case type.
- Open the States area.
- Add or edit a state of type document loading state.
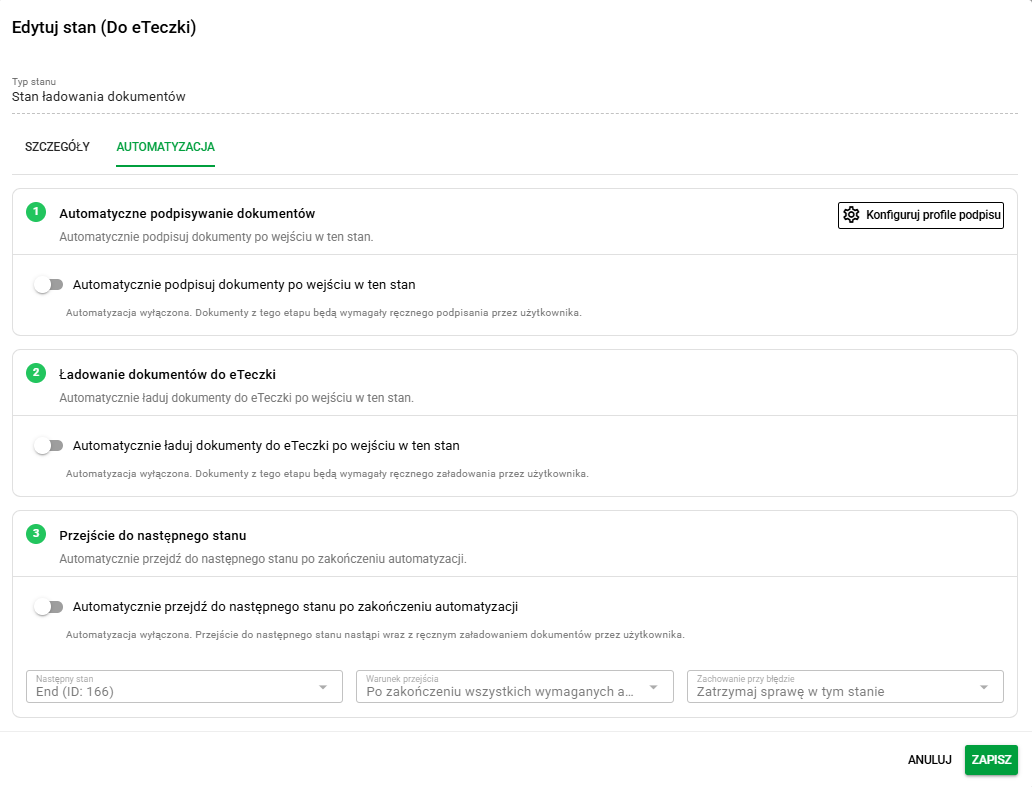
- In the state dialog, open the Automation tab.
How the automation starts
The automation starts automatically after the case enters this state, but only when at least one of the following is enabled in the configuration:
- Automatically sign documents when entering this state,
- Automatically load documents into eFile when entering this state,
- Automatically move to the next state after the automation is completed.
If all of these elements are disabled, the system does not create a background automation run.
Automatic document signing
The Automatic document signing section is used to define which document types should be signed automatically after the case enters this state.
After enabling Automatically sign documents when entering this state, a table is displayed with the following columns:
- Document type,
- Automatically sign,
- Signature configuration,
- Sign again,
- When already qualified-signed.
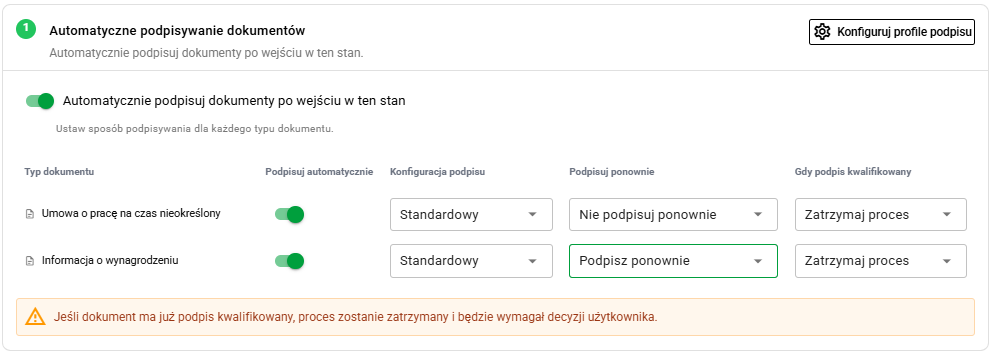
For each document type, you can decide separately whether that rule should be active. Enabling the main toggle does not mean all document types will be signed automatically. The rule must also be enabled in the individual row.
If automatic signing is disabled, documents from this stage must be signed manually by the user.
The individual options mean the following:
- Automatically sign: enables the rule for a specific document type.
- Signature configuration: selects the signature profile used for that document type.
- Sign again: defines whether the document should be signed again. The available options are Do not sign again and Sign again.
- When already qualified-signed: the currently available option is Stop process. If the system detects a qualified signature in the document, the automation stops and requires a user decision during retry.
If you enable signing for a document type but leave Signature configuration empty, the system blocks saving the state and displays a message about the missing configuration for the affected document types.
Signature profiles
The Configure signature profiles button opens a separate dialog for managing the profiles used by automatic signing rules.
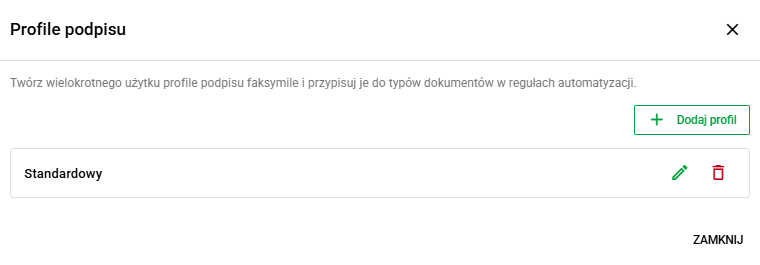
A signature profile is a reusable configuration. This means the same profile can be assigned to multiple rules for different document types within the same case type.
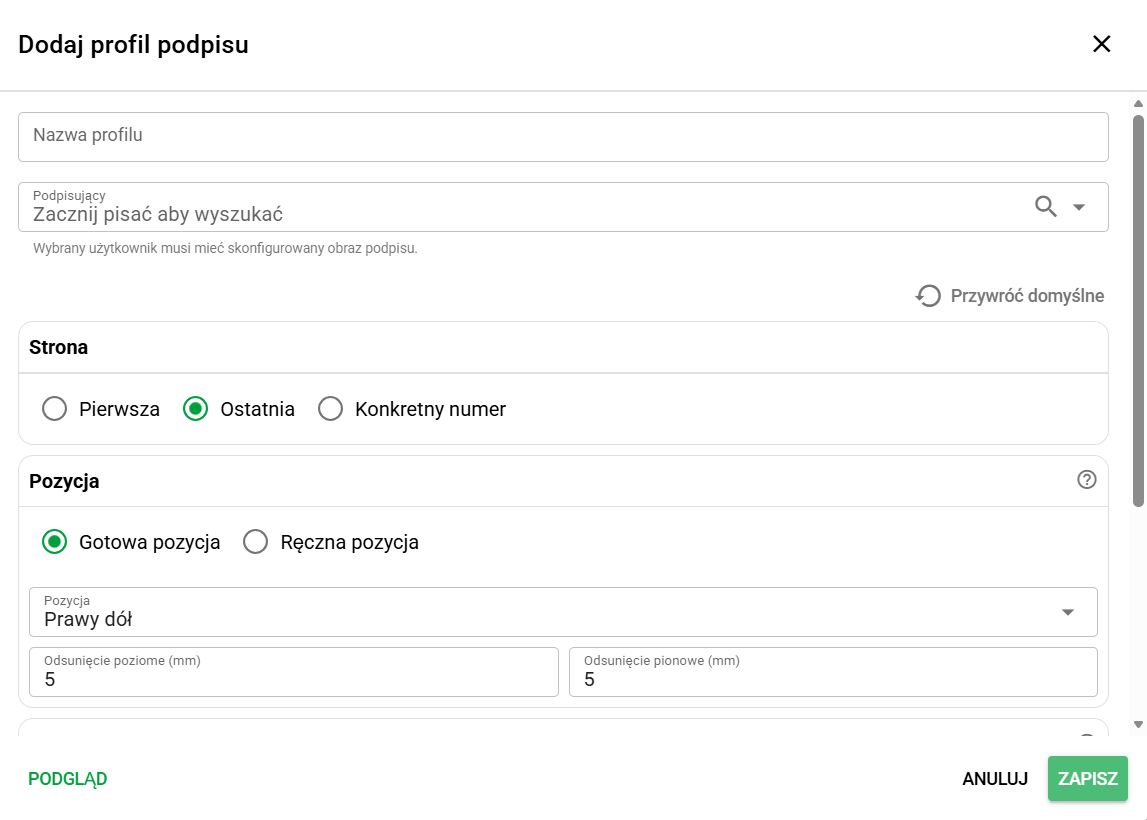
In the signature-profile form, you configure among other things:
- Profile name,
- Signer,
- facsimile placement and size options.
The user selected in Signer must have a signature image configured. If they do not have one, or if the image is invalid, the automation ends with an error for the document that requires signing.
The profile dialog also provides a Preview function. The system can generate the preview based on:
- an Example document,
- or your own PDF file uploaded only for local browser preview.
This makes it possible to verify signature placement before saving the profile and using it in automation.
Two administrative limitations are important here:
- a signature profile cannot be deleted while it is still used in automation rules,
- when a case type is imported or installed from the library, signing automation is not transferred together with the configuration.
Loading documents into eFile
This is an internal filing step in eFOB: documents already attached to the case are filed in the relevant employee eFolder. It is not an upload from outside the application.
The Load documents into eFile section lets you choose which document types should be filed automatically after the case enters this state.
After enabling Automatically load documents into eFile when entering this state, the system shows a table with the following columns:
- Document type,
- Load into eFile,
- Load unsigned,
- Behavior when document is missing.
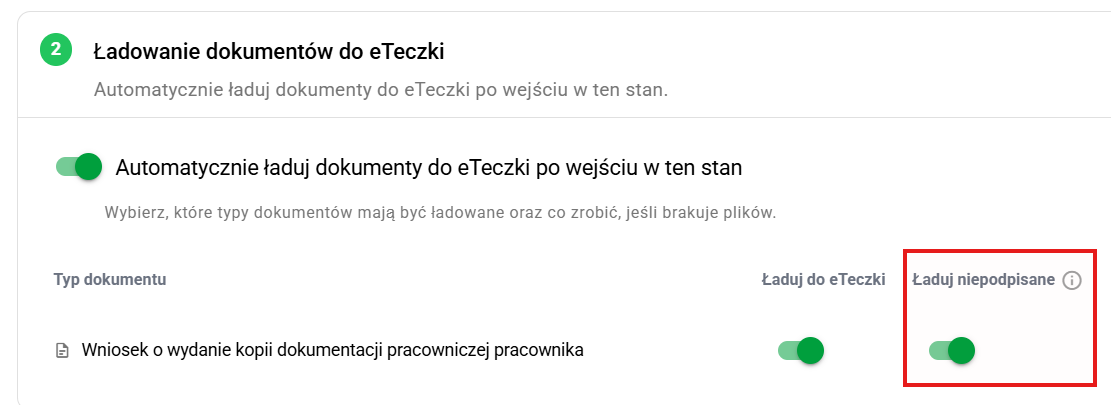
As in the signing section, the main toggle only enables the automation area. For each document type, you still need to decide in the individual row whether the rule is active.
If automatic loading is disabled, documents from this stage must be loaded manually by the user.
The individual table options mean the following:
- Load into eFile: enables the automatic loading rule for a specific document type.
- Load unsigned: allows the system to load the unsigned source file shown in the left column of document details, even if no signed version exists yet for that document type.
- Behavior when document is missing: defines what the system should do when it cannot find the required document for an active rule.
For an active loading rule, the currently available options are:
- Stop case and show error,
- Skip and continue.
The first option stops the automation run and shows the problem to the user. The second allows the process to continue without that document.
Decide whether unsigned documents may be filed
If the process allows a document to be filed in eFile without a signature, you can enable Load unsigned for that document type. It is off by default. Check your organization's requirements for the document before enabling it.
- Enable the Load into eFile rule for the document type.
- Decide whether this type of document may be filed in eFile without a signature.
- If it may, enable Load unsigned in the same row.
- Review the other rules and the transition to the next state, then save the configuration.
This option does not sign the document. It also does not replace the setting for what to do when a document is missing altogether. Signing, allowing an unsigned document, and handling a missing document are separate decisions.
Move to the next state
The Move to the next state section controls whether the case should continue automatically after the automation is finished.
The configuration contains:
- the Automatically move to the next state after the automation is completed toggle,
- the Next state field,
- the Transition condition field,
- the Behavior on error field.
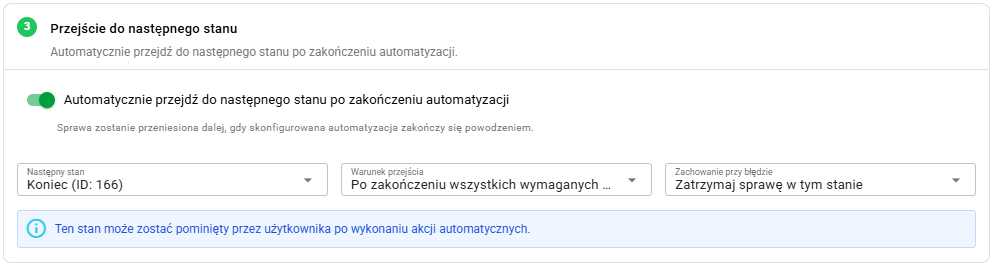
At the moment, Transition condition and Behavior on error each contain one option only:
- After all required actions are completed,
- Keep case in this state.
In practice, the two key settings today are enabling the automatic move and selecting the next state.
A dependency exists between loading and transition:
- automatic document loading always requires automatic move to the next state,
- when loading is enabled, the system automatically enables the move to the next state,
- as long as loading remains enabled, the transition cannot be disabled separately.
If you want to disable the automatic move, first disable automatic document loading.
The system still allows the configuration to be saved when automatic move is enabled but:
- automatic loading is disabled,
- or loading does not cover all available document types from the form.
In that case, a confirmation dialog is shown. Its purpose is to remind the administrator that the case may move to the next state without automatically loading all documents handled in this state.
Automation progress screen
After the case enters a state with active automation, the user sees the automation status screen. The status refreshes automatically every 5 seconds while the process is queued or running.
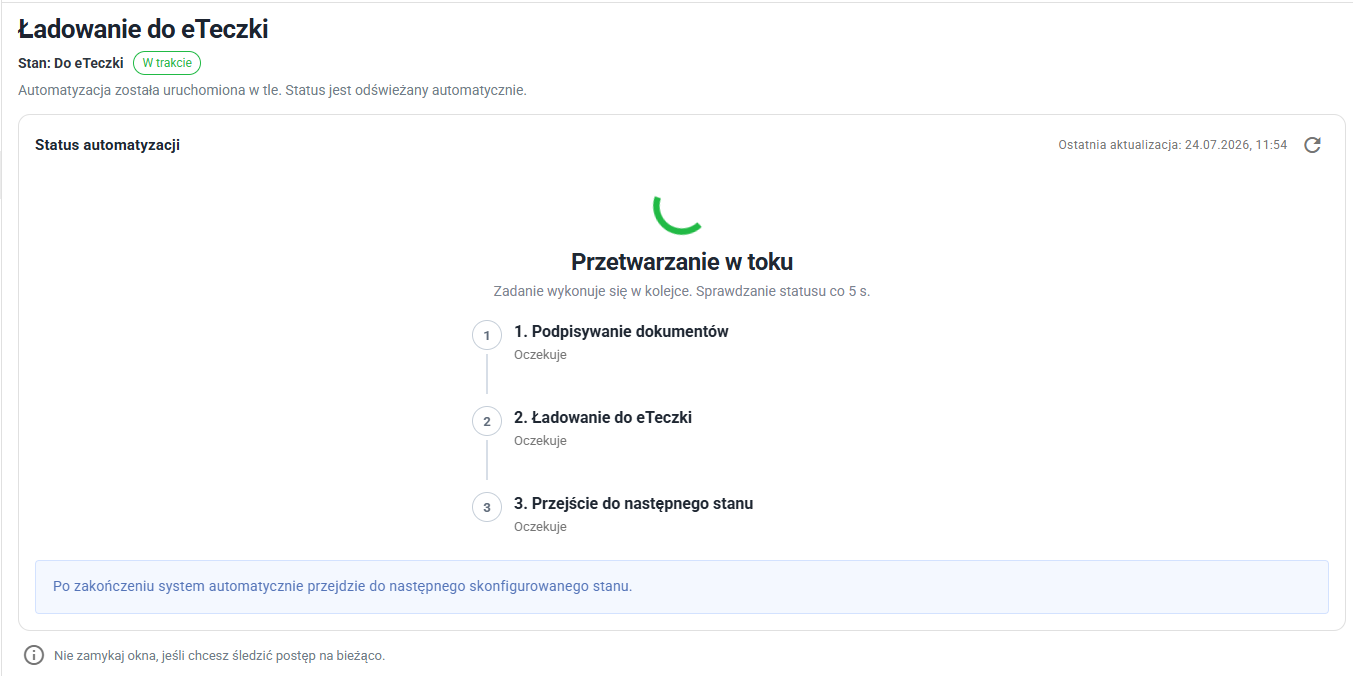
Depending on the run result, the user may see statuses such as:
- In progress,
- Completed,
- Stopped,
- Canceled.
Error handling and user decisions
If the automation stops with an error, the screen switches to a more detailed layout with the list of files included in the current run.
In this view, the user has access to:
- the Files in case list with counters for ready items, items requiring a decision, items requiring handling and items outside automation,
- issue details for the selected file or for a general problem,
- the Preview document and Download document actions when available for the selected item,
- the Decision handling section,
- the Retry automation section with the Retry button.
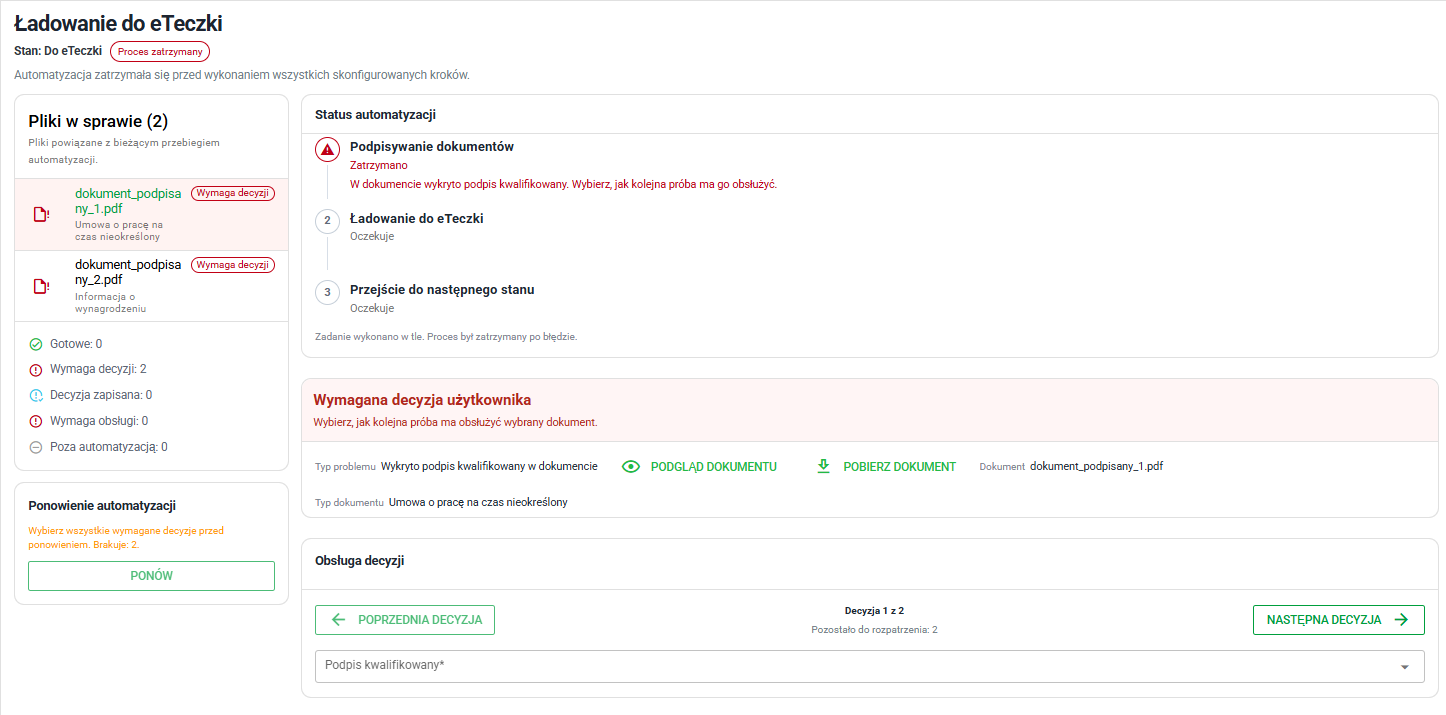
The most important decision-based scenario is a detected qualified signature in a document that should be signed automatically with facsimile.
In that case, the user must choose how the next retry should handle that document. The available decisions are:
- Leave unchanged,
- Overwrite signature.
The Retry button remains disabled until the user selects all required decisions for documents marked as needing review.
After the decisions are filled in, a new automation attempt can be started. The system checks the documents and the remaining process conditions again.
At the same time, the user still has access to the standard case-state actions, so the case can also be moved manually if needed according to the available process actions.
Importing and copying the configuration
The automation behaves differently when a case type is copied and when a case type is imported.
Copying a case type
When a case type is copied inside the system, the automation configuration is copied as well, and the signature-profile identifiers used in the rules are remapped to the new profiles in the copied case type.
Importing a case type
When a case type is imported:
- automatic signing rules are cleared,
- automatic signing is disabled,
- Document-loading rules are restored only when the system can match document types in the target environment.
If a document type cannot be resolved in the target environment, the related loading rule is not transferred.
This means that after importing a case type, the Automation tab should always be reviewed and the signing configuration should be rebuilt before the process is used in production.