Electronic signature – how to install the KIR/Szafir component?
Watch the recording of the webinar "Electronic signature and e-File"
A qualified signature on the eFOB platform works only on the Windows platform using a web browser (Chrome, Edge, Firefox or Opera).
The following procedure describes how to install all required components on Windows.
Initial installation
The installation procedure varies depending on the type of mobile (mSzafir) or card (USB) certificate you have. The installation procedure consists of three steps:
1. **JAVA environment **Depending on company IT requirements, please install one of the latest versions: a) OpenJDK open source available for commercial use - version 21 maintained by Microsoft is recommended, downloadable from: https://learn.microsoft.com/pl-pl/java/openjdk/download b) commercial version of Oracle JRE from the website: https://www.java.com/pl/download/ Note: Purchase of an Oracle subscription is required: https://www.oracle.com/java/java-se-subscription/.
2. Extension for Windows (Szafir Host program)Links to installation in the subsection below.
3. Web browser extension (Szafir SDK WEB)
- Google Chrome / Microsoft Edge: https://chromewebstore.google.com/detail/szafir-sdk-web/gjalhnomhafafofonpdihihjnbafkipc
- Firefox: https://www.elektronicznypodpis.pl/download/webmodule/firefox/szafir_sdk_web-0.0.10-anfx.xpi
- Opera: https://chromewebstore.google.com/detail/szafir-sdk-web/gjalhnomhafafofonpdihihjnbafkipc
Current Szafir installation files can be downloaded from the KIR website https://www.elektronicznypodpis.pl/informacje/aplikacje/
Note: after installing JAVA and extensions for Windows and the web browser, it is required to completely close all browser windows and restart it. Without completing this step, the signature window will launch and will be in the 'In progress...' state (blue status), which will prevent the actual execution of qualified signatures.
STEP 1. Installing JAVA (OpenJDK)
To properly operate the qualified signature environment, it is necessary to install the JAVA runtime environment.
The recommended Microsoft OpenJDK software can be downloaded from the link:
- (Windows x64, Msi) https://learn.microsoft.com/pl-pl/java/openjdk/download#openjdk-21
Please follow the displayed steps during installation.

STEP 2. Installation of the Szafir Host application
To properly submit a qualified signature, the "Szafir Host" software is necessary, which should be installed on the computer of the person signing the signature.
The software should be downloaded at the link (Applications and drivers \ Applications and drivers \ Sapphire electronic signature):
- (Windows 64-bit, version 1.2.1) https://www.elektronicznypodpis.pl/storage/file/core_files/2025/4/23/5a0d51798e371ff9d6830ae1508a1f9e/szafirhost.msi
- (Windows 32-bit, version 1.2.1) https://www.elektronicznypodpis.pl/storage/file/core_files/2025/4/23/8207c07e041f2425e788f3c970bb6975/szafirhost_x86.msi
If the browser is not installed in the system, when you try to run the "Szafir SDK" module, it will inform you about the need to perform such installation. In the window displayed by the browser, buttons will appear allowing you to download software for the selected operating system (in this case, only Windows).
During installation, please follow the displayed steps:1. Check the "I accept the terms of the License Agreement" box to confirm your acceptance of the Szafir Host product license terms. 2. Click the "Install" button to start installing the component. Installation may require Windows administrator privileges or assistance from your IT department. If the Windows system message appears asking you to accept the changes, select "Yes" and wait for the installation to complete.

STEP 3. Installing the browser extension
Signing from a browser requires installing a plug-in.
For Chrome, download the Szafir SDK Web extension from the Chrome Web Store at the link https://chromewebstore.google.com/detail/szafir-sdk-web/gjalhnomhafafofonpdihihjnbafkipc

Installation of the plug-in requires permission and confirmation from the browser user installation decision – as in the screen below.

For Firefox the extension is not available in the Web Store and must be downloaded from the link https://www.elektronicznypodpis.pl/download/webmodule/firefox/szafir_sdk_web-0.0.10-anfx.xpi

The Opera browser works with the extension from the Chrome Web Store and should be downloaded from the link https://chromewebstore.google.com/detail/szafir-sdk-web/gjalhnomhafafofonpdihihjnbafkipc

Installation of the plug-in requires permission and confirmation from the browser user installation decision – as in the screen below.

Installing components for the mobile certificate
Additionally, for mobile certificates (without card and reader), for the electronic signature to work properly, you must download and run:
1. CloudSigner software for handling and managing virtual smart cards
https://www.elektronicznypodpis.pl/aplikacje-i-sterowniki
Adding the mSzafir virtual card in the CloudSigner software
After downloading and installing CryptoCard CloudSigner, open the application from the list of running Windows applications or from the Start menu.
1. In the CloudSigner – virtual cards window, click the ++* button

2. Select the type of virtual card mSzafir and confirm

3. Launch the mSzafir mobile application on your phone and select "Generate code"
4. Enter the generated code in the OTT code fields and confirm

5. In the mSzafir application, confirm authorization of the operation
6. After authorization, the CloudSigner application will display a list of active certificates.

Detailed instructions for installing the virtual card at the link https://www.mszafir.pl/gfx/mszafir/userfiles/_public/tutoriale/jak_wykorzystac_certyfikat_mszafir_w_dowolnej_aplikacji_podpisujacej_20240425.pdf
Installation of components for the certificate on the card
For certificates on a card (with a reader or using a USB key), appropriate drivers for a given qualified signature card must be downloaded for the electronic signature to work properly. The instructions for the Graphite card are described below.
Instructions for activating the Graphite card and qualified certificate
To activate the card and certificate, download and run the Sapphire Installer available at the link: https://www.elektronicznypodpis.pl/aplikacje-i-sterowniki
Follow the displayed steps during installation.


In the last step, connect the card reader to the computer and confirm by pressing the "Finish" button.

The software will automatically launch the CryptoCard Graphite Manager window to activate the card.

After selecting the "Activate card" option, enter the PUK code (received in the envelope) and confirm with the OK button.

The next step is to activate the qualified signature.

In the transport PIN field, enter the PIN from the received envelope and in the fields below, enter your own PIN (from 6 to 16 characters, consisting of numbers and letters).

Full installation instructions for the Szafir software at the link https://www.elektronicznypodpis.pl/storage/file/core_files/2024/6/10/a26e19b431c39fe1139505d233da9d88/20200225_instrukcja_aktywacji_karty_graphite.pdf
The Szafir application does not detect the certificate saved on the card
When signing documents, an error may occur: no qualified signature detected, despite its actual installation.
As a first step, in the eFOB signature window "SIGN DOCUMENTS", check the "Show signature details window" checkbox. When the signature is available, the following window will appear:
1. Document preview
2. Signature certificate/timestamp certificate information

If the certificate is not visible in the above window (2), i.e. the "Select certificates" button is shown - when you press it, the following window will be displayed in the Szafir application:

In this case, you can try the following solutions:
1. Manually specifying the cryptographic card driver
In most cases, the problem is solved after manually completing the signature library configuration.
The procedure can be found, for example, in the article EKW - manual indication of the cryptographic card driver.
2. The system has selected the wrong PKCS#11 library for the card
If the user's computer has software installed to support different cryptographic cards, the signing application may try to use the wrong PKCS#11 library. In such a situation, the card or certificate may not be detected even though the correct card is inserted into the reader.
For example, if the user wants to use the CenCert Encard, the application should use the library:
C:\Program Files (x86)\ENCARD\enigmap11.dll– for 32-bit applications,C:\Program Files\ENCARD\enigmap11-x64.dll– for 64-bit applications.
However, if your system or application references the library instead:
C:\Program Files\SafeNet\Authentication\SAC\x64\IDPrimePKCS1164.dll
this means that a different card type is used than the one currently inserted in the reader. As a result, the application may not detect the certificate or report that there is no card available.
In such a situation you should:
- check whether various programs or libraries for cryptographic cards are not installed in the system,
- determine what type of card the user has,
- for the CenCert Encard card, indicate the appropriate PKCS#11 library,
- make sure that the application does not use a library intended for a different type of card,
- After changing the settings, close the browser and restart the signing process.
If no qualified certificate is detected in the signature window, you can use two available options:
- Show details window – opens the Sapphire window with a selection of certificates and additional diagnostic options,
- Run default certificate – runs the default certificate indicated in the system.

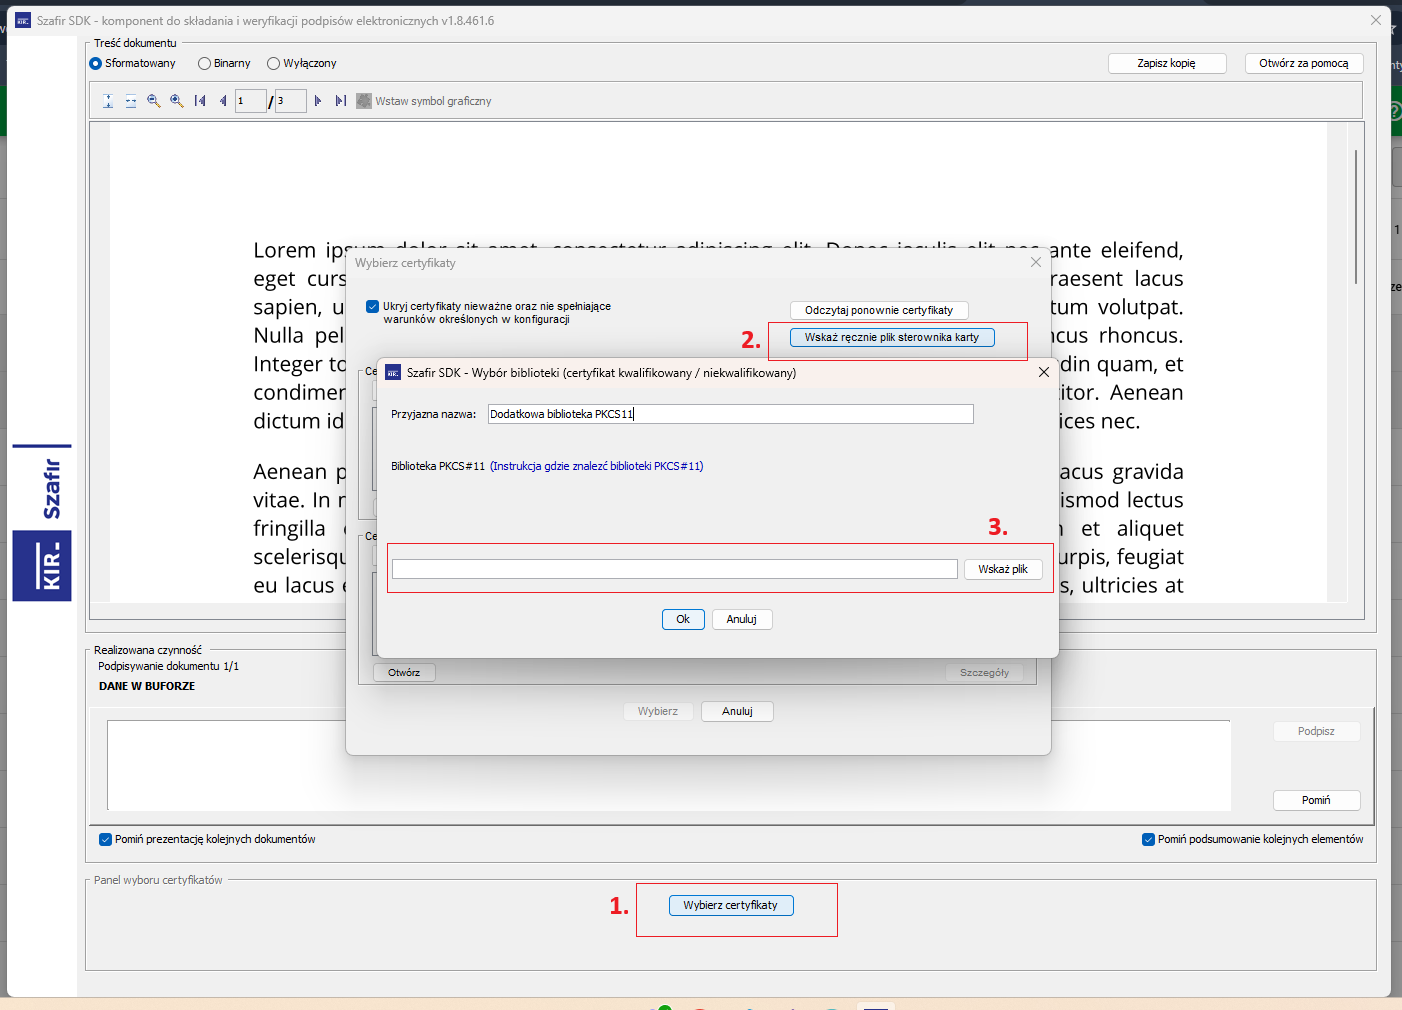
After selecting the Show details window option:
- click the Select certificates button,
- in the Sapphire window, click Select the card driver file manually,
- then click Select file and select the appropriate PKCS#11 library for the card you are using
For the CenCert Encard card it will be:
C:\Program Files\ENCARD\enigmap11-x64.dll– for 64-bit applications,C:\Program Files (x86)\ENCARD\enigmap11.dll– for 32-bit applications.
After selecting the correct library, confirm the selection and try to create the signature again.
Note: the problem may occur especially when components for several different types of cards are installed on the computer and the application automatically selects the wrong library that corresponds to the card used by the user.
3. Additional diagnostics
Some signature providers provide tools to generate additional reports on errors.
For example, for a CERTUM qualified signature, follow these steps:- install the proCertum CardManager package:proCertum CardManager – CERTUM » Technical support
- within proCertum Diagnostic, run Generate report

The program should list all libraries related to the card, including cryptoCertum3PKCS.dll - if it does not show, it means that the installation is missing.
4. Driver update
If the above solutions do not help, check the versions of installed drivers and download the latest available ones.
5. Contact Signature Provider
If errors still occur, please contact the qualified signature provider's hotline.