Case types
Case types
Introduction
Before learning about the possibilities of configuring case types, we recommend the article: Cases – introduction.
Case elements
The case type workflow is based on the concept of a state machine with one start state and one or more end states.
States have rich configuration options. The key elements of the cases are:
- States: Steps for executing a business process for a given case type
- Transitions (workflow): Defining the possibility of changing the case status and process path
- Forms: Binding a case type to specific data and form layout
- Document types: Assignment and organization of document types logically related to a given case type
- Signatures: Configuration of required electronic signatures for various document types within a case and permissions
- Permissions: Configuration of Data Access Roles permissions within a given case type
- Notifications: Automatic notification of participants and interested parties regarding changes
Quick start using the example of NDA
<script async src="https://js.storylane.io/js/v2/storylane.js"></script>
Administration of case types
Access path
To access the administration of case types, go to the menu/administration panel and select:

This will bring up the Check: screen

Affairs. General view
After clicking on specific case type, details will be displayed:
- side panel on the right to edit general case settings
- main panel on the left side for editing detailed settings of the case type in individual tabs
By default, the STATES tab opens.

Details of the case. State view
New case type
From the main Cases screen it is possible to create a new case type. After clicking the + ADD button, there are three ways to add a process:- Add case type - creating a new case type from scratch,
- Import case type - recreates the case type configuration from the JSON file,
- From library - installation of a ready-made process from the case library.
This section describes how to manually create a new case type. Importing configurations and adding processes from the library is described in a separate article: Process library and transferring case configurations.
Adding a case type from scratch
- Click on the “+ ADD” button
- Complete the required configuration fields
- Note: The case type code must be unique.
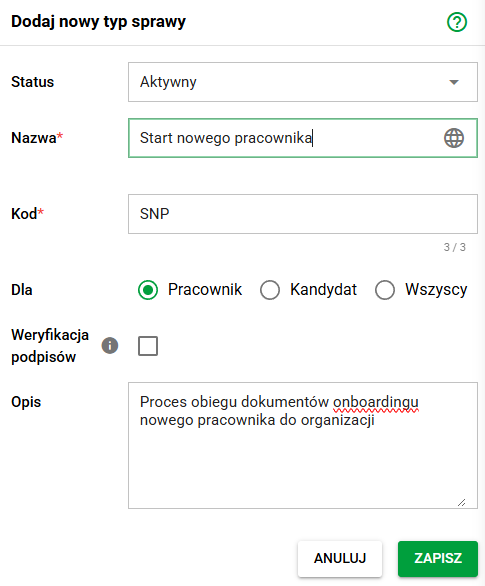
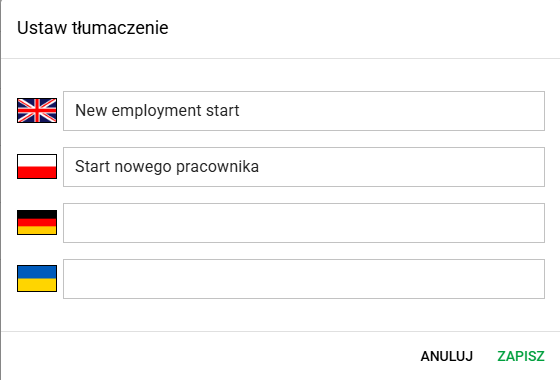
- Optional: Add translations for the case type name (globe button in the Name field)
After selecting Save, a new Case Type will be created. By default, it will open in the Transitions tab, where two states will be immediately visible - one starting state Start(1) and one ending state End(2), as well as two transitions between them - Go(3) (from Start to End) and Back(4) (from End to Start). These transitions can be freely modified in this tab after hovering over them and selecting the pencil symbol; more about editing transitions in the article Case transitions – eFOB eFolder.

In the Forms tab, one empty form called Form is defined by default, which is set as the default form for the Start and End states. These states can be viewed in the States tab. More information about editing forms and statuses can be found in the articles Case Forms – eFOB eFolder, Form Fields – eFOB eFolder and Case Statuses – eFOB eFolder.

Actions
The following actions are available: editing the case type, copying and deactivating/activating

Note: Case types marked internally as uneditable only have the Deactivate/Activate option, they do not have the case type editable.
Cloning case type
Copying a case type – this function allows you to create a new case type based on an existing configuration. When copying, settings from all case type tabs are transferred, so you do not have to configure the process from scratch.

Copying includes the configuration available in the case type tabs, in particular:
- States – definition of process states,
- Transitions – connections and possible transition paths between states,
- Forms – settings of forms used in the case,
- Document types – assigned documents and their configuration,
- Signatures - settings for groups and methods of signing documents,
- Permissions - rules of access and case handling,
- Notifications – configuration of messages and notification events.
The function is useful when a new case type is to be similar to an existing one, and the differences concern only selected elements. Once a copy is created, you can edit its configuration regardless of the source type.
Deactivate a case typeDeactivation will result in inactive status for a given record and will transfer the given type of issues to the second tab INACTIVE, where we can reverse the process in a similar way.
Effects of deactivating a case type:
- a specific case type will not be able to be used when creating new cases
- existing cases of a given type will still be available
- the search engine will have status data in the filters

Activation statuses
Edit the case type
Editing is performed using the button:
![]()
Edit button
It opens the menu responsible for changing status, name, unique code, description and allows you to assign a given case to an employee, candidate or all:

The edit must be confirmed by clicking the green button SAVE